Pumapeople: Heater Control Valve - Pumapeople

Jump to content

  • 2 Pages +
  • 1
  • 2
  • You cannot start a new topic
  • You cannot reply to this topic

Heater Control Valve How to fit a new one (not dial-up friendly)

#1 User is offline   Mountain Lion 

  • View gallery
  • Group: Members
  • Posts: 1802
  • Joined: 12-December 03
  • Location:Berkshire

Posted 17 March 2007 - 12:53 PM

Heater Control Valve Replacement


The heater control valve (HCV) controls the flow of hot coolant through the heater matrix, which is a small radiator that heats the cold air as it enters the car interior. The HCV does this by periodically opening and closing. It repeatedly allows hot coolant to flow through the heater matrix for a certain period, and then blocks the flow of coolant for a certain period. Thus the temperature of the heater matrix is governed by how much time the HCV spends in the open position, and how much time it spends in the closed position. These time periods are controlled by electronics in the heater control module, which is the control panel below the car stereo that contains the heater temperature control knob.


Figure 1 – The heater control valve


The HCV is a notoriously unreliable part. When it fails, the car’s heater usually sticks on either hot or cold, regardless of the position of the heater temperature control knob. Before the HCV fails completely, the heater temperature may fluctuate erratically between hot and cold for a period, before eventually sticking on either hot or cold.

There is also strong evidence to suggest that the plastic from which the HCV is made deteriorates over time and becomes brittle. Several Pumapeople members have reported pipes snapping off the HCV, or even complete disintegration.

This article describes the procedure for replacing a failed heater control valve.

excl.gif Removal of the heater control valve will result in some coolant loss, although because the HCV is at the very top of the coolant system, loss should be minimal. To minimise the amount of coolant that is lost, wait until the engine is cold before carrying out the procedure. Never allow coolant to come into contact with either the auxiliary drive belt or the cam (timing) belt, as contamination can lead to premature belt failure.

Parts required

A new heater control valve (available from the parts counter at your local Ford dealer)

Tools required

A Phillips (cross-head) screwdriver
A pair of mole grips (aka vise grips, or locking pliers)
A Large flat-bladed screwdriver

Step 1 – Detach Bulkhead Extension Panel

The bulkhead is the wall of metal at the rear of the engine bay that separates the engine bay from the interior of the car. The heater control valve sits on top of the bulkhead, under the windscreen, roughly in the middle. Attached to the upper part of the bulkhead is the bulkhead extension panel (aka scuttle board), which is a flimsy black piece of trim that runs the whole width of the engine bay. The HCV is behind this panel. More experienced DIYers may be able to replace an HCV without removing the bulkhead extension panel, but if this is your first time, you may want to remove it for easier access, and so that you can see what you’re doing.

First, remove the long rubber sealing strip from the top of the bulkhead extension (see Figure 2). The strip runs the whole of the width of the engine bay, from wing to wing.


Figure 2 – Remove rubber seal


The next thing to do is remove all of the screws that secure the bulkhead extension panel to the bulkhead. Most of these screws are easily accessible, but there are a couple that are hidden by the coolant expansion tank.

Remove the screw that secures the coolant expansion tank to the bulkhead (see Figure 3).


Figure 3 – Remove coolant expansion tank screw


Detach the coolant expansion tank from its bracket and pull the tank to one side (see Figure 4). To detach the tank, pull it upwards and off the bracket. You may have to insert a large flat-bladed- screwdriver into the tank’s slot to release it from the bracket.


Figure 4 – Detach the expansion tank from its bracket


Once the tank has been detached, there are two screws to be removed – one that was underneath the tank (see Figure 5), and one behind the windscreen washer filler cap (see Figure 6).


Figure 5 - Remove screw that was under expansion tank


Figure 6 - Remove screw from behind windscreen wash filler


Remove all of the remaining screws that attach the bulkhead extension panel to the bulkhead. Once all of the screws have been removed, you should be able to pull the bulkhead extension panel away from the bulkhead sufficiently to reveal the heater control valve (see Figure 7).


Figure 7 – Pull the bulkhead extension panel away from the bulkhead


If you can’t pull the bulkhead extension panel away sufficiently, it may be necessary to detach the metal plate from the panel (see Figure 8).


Figure 8 - Remove metal plate from bulkhead extension


Step 2 – Remove Old Heater Control Valve

Remove the rubber cup that protects the HCV’s electrics (see Figure 9).


Figure 9 – Remove the rubber cup


The HCV has four hoses attached to it – two at the front, and two at the rear. Using a pair of mole grips, release each of the hose clips and slide them up the hose, away from the HCV (see Figure 10). Release the clips by squeezing the two tabs towards each other with the mole grips.


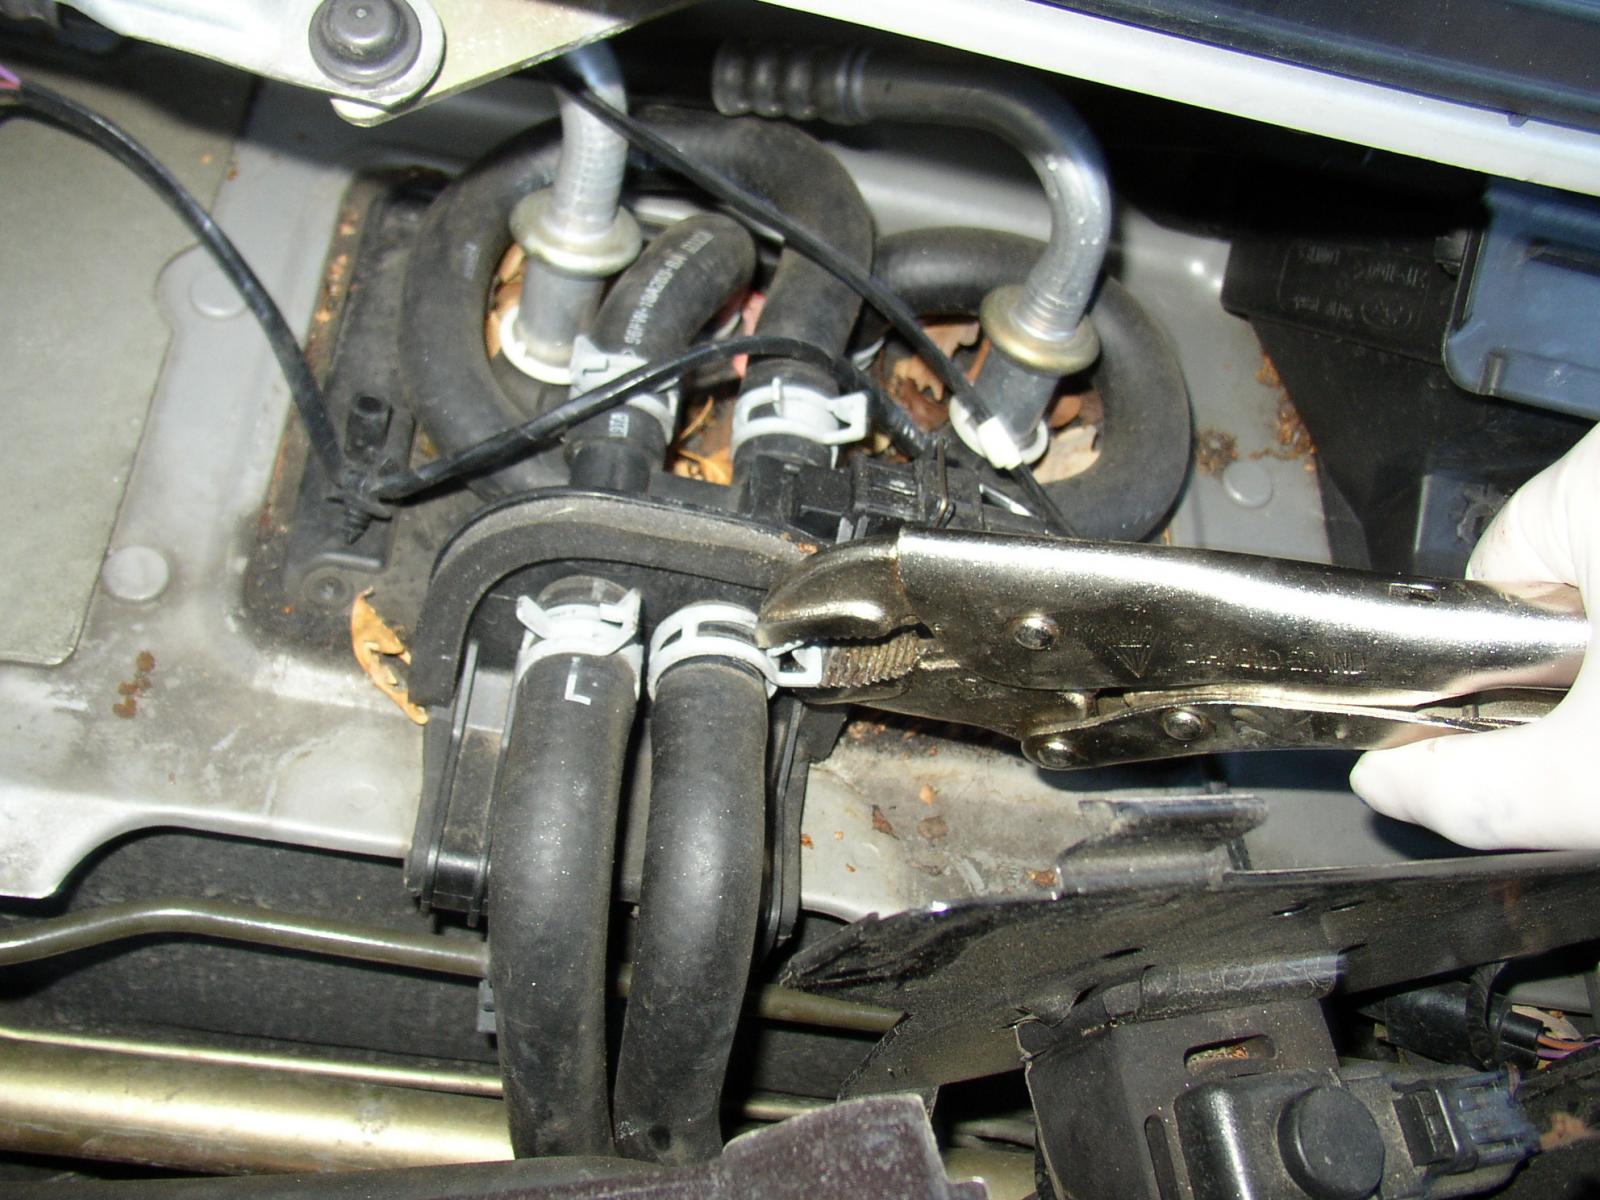
Figure 10 – Release the hose clips


Now pull all four hoses off the HCV (see Figure 11). If the hoses are tight, you may find that twisting or wiggling the hoses helps. Ensure that you remember which hoses were attached to which pipes on the HCV.


Figure 11 – Detach the hoses


Detach the electrical connector from the HCV by depressing the metal locking clip with your thumb and pulling the connector plug (see Figure 12).


Figure 12 – Detach the electrical connector


The HCV can now be removed. Figure 13 shows the HCV removed.


Figure 13 – The HCV removed


Step 3 – Fit the New Heater Control Valve

Slide the new heater control valve on to its platform (see Figure 14).


Figure 14 – Slide the new HCV into position


Reconnect all four hoses to the HCV and slide the hose clips back into position.

Refit the electrical connector.

Refit the rubber cup over the electrical connector.

Now is a good time to test the new HCV for leaks (before you refit the bulkhead extension panel). To do this, refit the coolant expansion tank on to its bracket. Check the coolant level and top up if necessary. Set the heater temperature control knob to maximum (hot) and start the engine. While the engine is running, check all four of the HCV hoses for leaks. Note that you haven’t yet tested the coolant system, so keep an eye on the engine temperature and be ready to cut the engine if it gets too hot.

Refit the bulkhead extension panel (detaching the coolant expansion tank so that you can refit the two hidden screws).

If the metal plate was detached from the bulkhead extension panel, refit it (see Figure 8).

Refit the coolant expansion tank.

Refit the rubber seal to the top edge of the bulkhead extension panel.

Check the coolant level, and top up if necessary.

Step 4 – Test the Coolant System

Whenever you carry out any work on the coolant system, you should always run a test to ensure that it is still working correctly. This usually involves starting the engine and waiting until the radiator fan has started and stopped twice (two fan cycles). A close eye should be kept on the engine temperature gauge, and you should be ready to cut the engine if it appears to be getting too hot.

If an airlock has been introduced into the system, it may be necessary to bleed it. See this post for more details.

This post has been edited by Mountain Lion: 12 May 2007 - 08:41 AM


(the beauty of mathematics)

#2 User is offline   richy1985 

  • Group: Members
  • Posts: 64
  • Joined: 25-January 07
  • Location:Crewe- Cheshire

Posted 15 September 2007 - 09:39 AM

wer the best place 2 buy the hcv ? from fords??

#3 User is offline   Del 66 

  • Group: Members
  • Posts: 1563
  • Joined: 11-July 03
  • Location:Kent

Posted 15 September 2007 - 10:18 AM

Bought a brand new one off ebay for £20, genuine ford part. No need to take anything apart, done mine in 5 minutes. Just unclip the four hoses and remove spring clip from wiring and the whole thing pulls foward, with a bit of a wiggle it will come out.
Del & Milly #0066

#4 User is offline   BOK 

  • Group: Members
  • Posts: 10212
  • Joined: 18-February 03
  • Location:Oxon

Posted 15 September 2007 - 12:20 PM

Just had a new one fitted by Tremona today, drove home and all is cool. Unfortunately it now feels like a different season in the car whereas previously it was always summer sad.gif

#5 User is offline   Del 66 

  • Group: Members
  • Posts: 1563
  • Joined: 11-July 03
  • Location:Kent

Posted 15 September 2007 - 12:25 PM

I only had to buy a new one as I broke mine when fitting Samco hoses. I think the HCV had perished on the outlet, it just crumbled away when removing the old pipe. Works better than before though.
Del & Milly #0066

#6 User is offline   richy1985 

  • Group: Members
  • Posts: 64
  • Joined: 25-January 07
  • Location:Crewe- Cheshire

Posted 17 September 2007 - 11:13 AM

QUOTE (Del 66 @ Sep 15 2007, 11:18 AM) <{POST_SNAPBACK}>
Bought a brand new one off ebay for £20, genuine ford part. No need to take anything apart, done mine in 5 minutes. Just unclip the four hoses and remove spring clip from wiring and the whole thing pulls foward, with a bit of a wiggle it will come out.


nice 1 4 that m8! i willl check ebay out then!! rolleyes.gif

#7 User is offline   e3silversurfer 

  • Group: Members
  • Posts: 3902
  • Joined: 22-February 07
  • Location:Newcastle Upon Tyne

Posted 18 September 2007 - 11:59 AM

beware of the top metal part of the car chassis. it is very jagged and an accidental slip against it would cause your finger's bone to be exposed... not kidding... dry.gif

#8 User is offline   AmiloD 

  • Group: Members
  • Posts: 68
  • Joined: 14-September 07
  • Location:Oslo, Norway

Posted 28 September 2007 - 11:01 AM

How much does a new HCV cost at fords? (to get an idea)

Also.. what are the signs of a dying HCV? Hot air coming through air vents even with selector at cold?

#9 User is offline   gaznlou 

  • Group: Members
  • Posts: 509
  • Joined: 23-January 06
  • Location:A Village Nr Rugby

Posted 28 September 2007 - 09:53 PM

Mountain Lion
Excellent write up, mind you mate you should really buy a wiper cap cover laugh.gif
Sometimes I wonder... "Why that Frisbee is getting bigger" ....and then it hits me!

#10 User is offline   Mountain Lion 

  • View gallery
  • Group: Members
  • Posts: 1802
  • Joined: 12-December 03
  • Location:Berkshire

Posted 29 September 2007 - 01:07 AM

That photo shoot was done a few years ago - new wiper nut and plastic cap were fitted soon after.
That particular Puma has had two more heater control valves fitted since that one.
To stop the plastic cap flying off again, I put a small drop of super glue on the side before inserting it into the recess. wink.gif

(the beauty of mathematics)

#11 User is offline   AndyPeacock 

  • Group: Members
  • Posts: 11
  • Joined: 18-December 06
  • Location:Lincoln

Posted 20 October 2007 - 02:19 PM

QUOTE (Mountain Lion @ Sep 29 2007, 02:07 AM) <{POST_SNAPBACK}>
That photo shoot was done a few years ago - new wiper nut and plastic cap were fitted soon after.
That particular Puma has had two more heater control valves fitted since that one.
To stop the plastic cap flying off again, I put a small drop of super glue on the side before inserting it into the recess. wink.gif


Fantastic write up, my HCV outlet broke off today and spat the entire contents of my coolant system all over the floor. I'll be replacing it on Monday with the aid of this guide! Thanks for taking the time to write it up.

Andy

#12 User is offline   Spike 

  • Group: Members
  • Posts: 2914
  • Joined: 02-December 07
  • Location:Bournemouth

Posted 26 December 2007 - 02:14 PM

very helpful guide... As this is on my list of things to do on my FRP...

Do the hoseclips go back ok, or would it be an idea to get new ones?

#13 User is offline   murrayxxx77 

  • Group: Members
  • Posts: 70
  • Joined: 15-December 07

Posted 05 January 2008 - 05:39 PM

QUOTE (spikebmth @ Dec 26 2007, 02:14 PM) <{POST_SNAPBACK}>
very helpful guide... As this is on my list of things to do on my FRP...

Do the hoseclips go back ok, or would it be an idea to get new ones?


Hi All,

Just bought a Puma which had a tropical temp inside whatever the heater position. Knew it would be the heater control valve having read loads of posts on its unreliability. However, when I came to look at it the sneaky 'expletive deleted' seller had bypassed the broken control valve, which was just rattling around in the scuttle, with a couple of pieces of nylon tube.

My question is ... is there an easy way to tell which hose goes where on the heater control valve ? I notice the replacement write-up said to make sure you don't mix the hoses up so sods law being what it is I'd rather not gamble on getting it right using chance as a tool !

Murray

#14 User is offline   Mountain Lion 

  • View gallery
  • Group: Members
  • Posts: 1802
  • Joined: 12-December 03
  • Location:Berkshire

Posted 06 January 2008 - 12:09 AM

QUOTE (spikebmth @ Dec 26 2007, 02:14 PM) <{POST_SNAPBACK}>
Do the hoseclips go back ok, or would it be an idea to get new ones?

The hose clips are strong and springy enough to be reused, so there's usually no need to buy new ones. The Puma featured in this article is now on its fifth heater control valve(!), but still has the original hose clips.

QUOTE (murrayxxx77 @ Jan 5 2008, 05:39 PM) <{POST_SNAPBACK}>
My question is ... is there an easy way to tell which hose goes where on the heater control valve ? I notice the replacement write-up said to make sure you don't mix the hoses up so sods law being what it is I'd rather not gamble on getting it right using chance as a tool !

See this thread, but to be honest, I have a strong suspicion that it doesn't really matter. You might as well connect them as Ford intended though, to avoid putting undue strain on any of the hoses.

(the beauty of mathematics)

#15 User is offline   JJJ 

  • Group: Members
  • Posts: 3
  • Joined: 18-January 08

Posted 19 January 2008 - 10:13 AM

QUOTE (Mountain Lion @ Jan 6 2008, 12:09 AM) <{POST_SNAPBACK}>
The hose clips are strong and springy enough to be reused, so there's usually no need to buy new ones. The Puma featured in this article is now on its fifth heater control valve(!), but still has the original hose clips.


See this thread, but to be honest, I have a strong suspicion that it doesn't really matter. You might as well connect them as Ford intended though, to avoid putting undue strain on any of the hoses.


The Valve is just about £20 at ford now as it has been reduced in price.

I fitted one last march and it have just got another under warranty but it is still blowing hot....Help what else can it be...Electrics ???????

#16 User is offline   happy-kat 

  • Group: Admin
  • Posts: 21811
  • Joined: 10-February 03

Posted 19 January 2008 - 10:16 AM

take it back and get a replacement, it may be a faulty valve.
Also check you are getting one with the correct serial ending of AC
searching is fruitful | I'm a sponge not a mechanic | please do try that if stuck with a Puma problem whilst waiting for a reply | For the Puma fan this read 'The Inside Story Book' is very nice to own sometimes still seen for sale

#17 User is offline   JJJ 

  • Group: Members
  • Posts: 3
  • Joined: 18-January 08

Posted 19 January 2008 - 10:37 AM

QUOTE (happy-kat @ Jan 19 2008, 10:16 AM) <{POST_SNAPBACK}>
take it back and get a replacement, it may be a faulty valve.
Also check you are getting one with the correct serial ending of AC


What do you mean correct serial ending AC

QUOTE (JJJ @ Jan 19 2008, 10:34 AM) <{POST_SNAPBACK}>
What do you mean correct serial ending AC
Just answered my own ? theone i have just put on ends in AB

#18 User is offline   JJJ 

  • Group: Members
  • Posts: 3
  • Joined: 18-January 08

Posted 19 January 2008 - 12:31 PM

I took new valve back this morning and have replaced it with another one..serial no still ends in AB (that is all ford dealer had ) It still does not work heater stuck on hot I am guessing it must be the control panel..any ideas of a fix or a cost or any other ideas please?????

#19 User is offline   mark_f1 

  • Group: Members
  • Posts: 279
  • Joined: 08-September 06
  • Location:Doncaster

Posted 27 January 2008 - 11:46 PM

Great guide!

Replaced mine today, both plastic connectors broke clean of the old valve and were stuck in the hoses. So had to get jiggy wi a screwdriver to get the buggers out.

It can be done without taking the scuttle panel out but it makes life so much easier.

#20 User is offline   JonnyH 

  • Group: Members
  • Posts: 2
  • Joined: 15-June 05

Posted 31 January 2008 - 02:42 PM

Hi,

I have the same seemingly unfixable problem as JJJ. I replaced the heater valve myself last year (thanks to the great guide here) with a new one from Ford. It didn't make any difference - still blew hot. Just had it in at the garage (not ford) to make sure I had fitted it right and the mechanic fitted another new one. Again no difference....still only hot.

It is pulsing between 0 and 12v as it should on the terminal connector to the HCV. I can't understand why the valve isn't working - is it a digitally coded pulse or something?

Does anyone please have any ideas?

Share this topic:


  • 2 Pages +
  • 1
  • 2
  • You cannot start a new topic
  • You cannot reply to this topic