
 Help
Help


I found #444 in August 2006 and I think it's looking better now than it did when it was purchased back then. The exhaust was dead so the first thing I did was grab a whole new stainless system. Piper manifold and Miltek for the rest. Next on the list was a full service and cambelt change with Topgear Automotive.
I then pottered around in it for 2 years as my daily drive and not a lot was done.
In the last year however, I moved house and ended up getting my own garage so I thought I would treat the car to a few things.
This time last year the car was driven into by some woman in a car park, luckily details were left for me and the insurance company got the front bumper replaced!
The previous brake service (thanks to Eldude-Build) included a new set of stainless bolts and new rubber seal kit along with freshly painted calipers.
I've kept the original tailpipe and had it welded onto the stainless system, can't believe how long I have been meaning to do this, almost 3 years!
I've had some spray work done and also got paintshield material (they're huge) for the rear arches.
Got some old, original and faded Ford Racing badges. Sanded them back with new Ford Racing labels glued onto the underside of the badge plastic. This is another thing I've been waiting ages to sort out as my car was badgeless since I got it. Ten times better than a Gel badge.
All of the wheels have been refurbished when it was in for spray work, it was a cheap job but they still look better than they did and I can get them done properly at a later date.
New Ford Racing wheel centre caps have been stuck on in the last few months. The little things like this really make it look complete and it feels worth it to look at the car without flakey centre caps and empty, badgeless side windows.
I did respray the engine cover in black crackle effect paint with imperial blue underneath, it looked great but for some reason the lacquer is coming up with lots of tiny bubbles in the crackled areas so I guess it's just not working with the engine heat.
And so, as it's been a while since we had nice weather I haven't had much of a chance to get out and take some nice pictures since all the above work has been done.
a few weekends ago I managed to do get some nice pictures, I got the car washed, polished, waxed (meguars idiots guide 3 step system because detailing gets me all confused) on Saturday. Then Sunday, I went for a blast, took a camera and with the help of the girlfriend took some pretty pictures and I thought I would share them. I also thought they could be useful for Big Boy Al as I know he's building a collection of FRP photos and I don't think he has any of mine.


Only things at the moment that I really want to sort are:
*Complete de rusting of the underside of the car - thinking of maybe trying the Deox-gel from Bilt Hamber.
*Steering wheel retrim and possibly drivers seat base retrim.
*Needs new rear lights, the transparent plastic covers seem to be cracking a little in some places, haven't a clue why.
*Interior silver dash surround looking a little tired in a few places, could do with a respray.
*Repsray engine cover due to above mentioned lacquer problem.
*Sprayers missed a bit just above tailgate (hard to get to bit), if you look in the gap between the window and roof, you can see a big patch of what looks like just primer.
*Sprayers sprayed over front bumper/wing rubber join, can't be bothered to go back to them yet again so will go elsewhere.
*I seem to have excessive indentation in the front wings where they are bolted to the front bumpers, may have been tightened too much and forced out of shape so I would really like to get this sorted or see if it can be rectified.... you can really see the indent on the passenger side in the close up photo of the front of the car. It's a lot more obvious in the flesh. It's supposed to be normal but I've never seen a photo of an FRP with indents like mine. Or indents full stop, lol. Perhaps I'll be able to compare wings at Castle Combe this year.
* Original Racing Puma mats need installing.
Well, that's the story with #444 so far! Hope I didn't bore you guys, sorry it's such a long waffling post. I'll stick updates on when I do any of the above but it might be a slow process. Any advice/tips or comments welcome.
Cheers
Gary
P.S no, it's not for sale


 but If I can get something done to the FRP that I want doing then I'll do it with some spare left overs if there is any, lol.


 , been trying to do things to mine now for two years almost 3 and it never stops, you will find the things you done a year or two ago need doing again and things like brake disk centres and touching up paint on underside etc never stops.
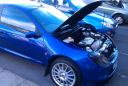


 . The cross is easy to cut with a knife and still gives the carpet screws a decent grip on the edge of the carpet.


