Pumapeople: Puma Black - Project Thread - Pumapeople

Jump to content

  • 13 Pages +
  • 1
  • 2
  • 3
  • 4
  • 5
  • Last »
  • You cannot start a new topic
  • You cannot reply to this topic

Puma Black - Project Thread Rate Topic: ***** 3 Votes

#41 User is offline   FlashBastd 

  • Group: Validating
  • Posts: 3900
  • Joined: 17-August 08
  • Location:West Yorks

Posted 03 October 2009 - 10:05 PM

Having applied the Dymax S-50 quite generously, I was suprised at how it had crept through some of the seams, notably in the sills, puddling on the drive. Still, should be better now!

Gave the speaker pods a wipe down, with the help of my small assistant;

Posted Image

Then applied some Damplifier Second Skin to each pod;

Posted Image

Posted Image

Rear interior trim stripped for application of rust proofing and sound deadening;

Posted Image

Damplifier Second Skin to the floor and under seat area;

Posted Image

And to the rear quarters;

Posted Image

Posted Image

Speaker Pods in;

Posted Image

Posted Image

Replaced the drivers side door rubber as the original one had split, not really worthy of a photo though.

Quarters and luggage compartment trims refitted;

Posted Image

I also got the rear seats refitted, shelf in, etc. this afternoon, and got the inside of the windows cleaned.

Not actually driven it yet, so I don't know what the noise or sound quality is like yet, but everything seemed to go back together without a hitch.

Jobs remaining;

1. Clay and polish the exterior
2. Clean interior windows
3. Swap back to alloy on the o/s/r
4. Touch up small scuff on the freshly painted caliper. Should be able to do this through the spokes of the wheel though, so going to wait until it is swapped.
5. Another quick vac out
6. Refix remote stereo control - this always seems to fall off when the car is in for repair, yet I never have a problem with it?
2005 Vauxhall VX220 Turbo
2000 Ford Focus 1.6i Ghia
2006 Renault Clio 2.0i RenaultSport 197 - SOLD
2005 Honda CR-V 2.0i Executive auto
2001 Ford Puma 1.7i Black

#42 User is offline   happy-kat 

  • Group: Admin
  • Posts: 21811
  • Joined: 10-February 03

Posted 04 October 2009 - 06:31 PM

I confess to being a stereo sound numpty, and find the standrd stuff is OK :mellow:
The looks like a lot of patience to cut and fit that to size :)
You are nearly there :D wont be long till you are turning the key (hope the battery wont be flat.
searching is fruitful | I'm a sponge not a mechanic | please do try that if stuck with a Puma problem whilst waiting for a reply | For the Puma fan this read 'The Inside Story Book' is very nice to own sometimes still seen for sale

#43 User is offline   FlashBastd 

  • Group: Validating
  • Posts: 3900
  • Joined: 17-August 08
  • Location:West Yorks

Posted 04 October 2009 - 06:42 PM

Thanks, I had hoped to use the car today, but just didn't have time, battery should be fine (touch wood!).

To be honest, with the help of my small assistant, it wasn't that big of a job, fortunately the materal comes in sheets, and half a sheet didn't need that much trimming for either side, little more than a few snips so the stuff would fold nicely. The bit around the speaker was just an offcut from doing the box its'elf.

I'm not really into my car audio either, but had been a bit daunted by the prospect of removing the rear quarters, so wanted to get everything that might need to be done, done at once.

Interior related tasks are now finished, still got the rest to do though, hopefully most of it on evening later this week.
2005 Vauxhall VX220 Turbo
2000 Ford Focus 1.6i Ghia
2006 Renault Clio 2.0i RenaultSport 197 - SOLD
2005 Honda CR-V 2.0i Executive auto
2001 Ford Puma 1.7i Black

#44 User is offline   FlashBastd 

  • Group: Validating
  • Posts: 3900
  • Joined: 17-August 08
  • Location:West Yorks

Posted 07 October 2009 - 09:46 PM

Wheel refitted, caliper touched up, mudflaps refitted, audio remote refitted.

Still needs a clay and polish, but I need weather and time for that.

I have a few bits that I need to get fitted;

1. replacement heater control panel, without cigar lighter, and a 12v accessory socket to fit in the glove compartment;

Posted Image

At the same time I am going to replace the pop-port cable to my carkit with a new one as I have been having a few probs with it. Also need to check the wiring to the laser diffuser.

2. ST170 calipers, I finally have some pads that fit, the Mintex ones were the wrong shape, and there was no way they were going to fit these calipers and carriers without serious modification. Just need to touch up the gold paint and also paint the carriers;

Posted Image

3. FRP tailpipe, really like the look of these, and also miss my old Piper FRP tail. Hopefully with this I can have Milltek noise but FRP looks;

Posted Image

The above should all be pretty straightforward, certainly brakes and heater panel will be done in the next couple of weeks. I am hoping the tailpipe won't take much longer.

When I get time, I also want to rustproof and sound deaden the front doors, and fit some Pioneer 13cm components.

Will try and take more pics along that way!
2005 Vauxhall VX220 Turbo
2000 Ford Focus 1.6i Ghia
2006 Renault Clio 2.0i RenaultSport 197 - SOLD
2005 Honda CR-V 2.0i Executive auto
2001 Ford Puma 1.7i Black

#45 User is offline   happy-kat 

  • Group: Admin
  • Posts: 21811
  • Joined: 10-February 03

Posted 08 October 2009 - 07:47 PM

The tailpipe is nice, it is a good size and nicely balanced to look at and not over stated.
searching is fruitful | I'm a sponge not a mechanic | please do try that if stuck with a Puma problem whilst waiting for a reply | For the Puma fan this read 'The Inside Story Book' is very nice to own sometimes still seen for sale

#46 User is offline   Rich_ST 

  • Group: Members
  • Posts: 204
  • Joined: 10-August 05
  • Location:Essex

Posted 09 October 2009 - 07:41 PM

Looking good mate. Out of interest where did you get the cap for the cigarette lighter, and does it fit the newer dash, with the ciggy lighter in the main panel?

#47 User is offline   FlashBastd 

  • Group: Validating
  • Posts: 3900
  • Joined: 17-August 08
  • Location:West Yorks

Posted 09 October 2009 - 08:17 PM

Not just a cap, but a luggage compartment accessory socket for a Focus. I will dig up a FINIS later.

Heater control panels should be interchangeable. People (including Bok I think) swap back to the earlier style to change the illumination colour.
2005 Vauxhall VX220 Turbo
2000 Ford Focus 1.6i Ghia
2006 Renault Clio 2.0i RenaultSport 197 - SOLD
2005 Honda CR-V 2.0i Executive auto
2001 Ford Puma 1.7i Black

#48 User is offline   FlashBastd 

  • Group: Validating
  • Posts: 3900
  • Joined: 17-August 08
  • Location:West Yorks

Posted 11 October 2009 - 10:21 PM

FINIS on the socket is 1333905

This post has been edited by FlashBastd: 11 October 2009 - 10:21 PM

2005 Vauxhall VX220 Turbo
2000 Ford Focus 1.6i Ghia
2006 Renault Clio 2.0i RenaultSport 197 - SOLD
2005 Honda CR-V 2.0i Executive auto
2001 Ford Puma 1.7i Black

#49 User is offline   FlashBastd 

  • Group: Validating
  • Posts: 3900
  • Joined: 17-August 08
  • Location:West Yorks

Posted 11 October 2009 - 10:53 PM

I haven't done anything I said I was going to, but have still been busy today.

Another weekend, another opportunity to lift up the back end of the car and take bits off, before laying on some wet tarmac in the rain.

So, this morning I jacked it up as high as the trolley jack would allow, popped in some stands, whipped off the back wheels, removed the spare and carrier, then set to removing both of the rear wheel arch liners;

Posted Image

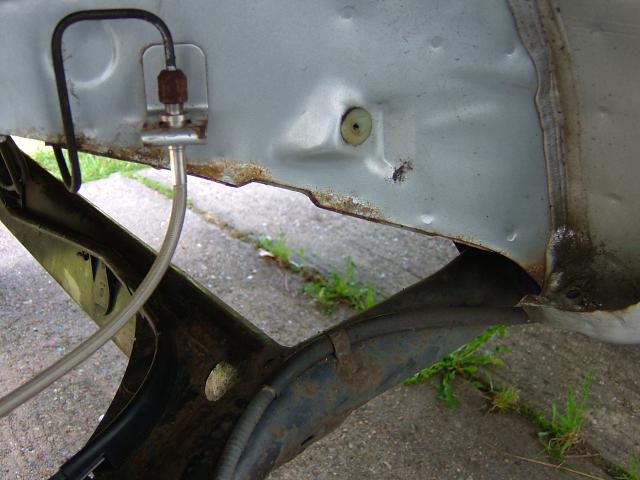
This meant I could get a good look at the hidden rust;

Drivers side

Posted Image

Posted Image

and the arch that has just been repaired;

Posted Image

Passengers side

Posted Image

Posted Image

Both sides were suffering along the bottom of the inside edge, I couldn't get the access to this that I wanted on the drivers side because of the rear box and heat shield. I will attend to this area when I can get the car to the garage, at which point I will do the rest of the underside.

Boot floor

Posted Image

Posted Image

Wasn't so bad, but was a bit tatty on the chassis rail, I think the other side won't be quite as bad, I expect it will have had some protection due to the exhaust and heat shield. Could be wrong though.

Spare wheel carrier was also very tatty.

So, using a drill with a wire brush attachment, I cleaned up the rusty bits, then washed / degreased with Auto Glym Engine & Machine Cleaner, before rinsing and drying with paper towel. While that was drying a bit more, I washed off the wheel arch liners, using the same stuff. What really surprised me was how quickly they dried - granted, it was quite breezy, but within 2 hrs they were pretty much dry.

Next step was to treat the arches and boot floor with some Hydrate 80, this stuff is pretty thin, my daughter thought the car needed some milk!

The fuel filler pipe makes things a touch awkward on the near side, but I am pretty sure I got reasonable coverage. Also tried to get up to the filler neck as much as possible.

Posted Image

Posted Image

Posted Image

When applying it was a very light blue colour, which was initially concerning, but it soon dried to a translucent grey colour.

Posted Image

Posted Image

Posted Image

Posted Image

I applied two coats of the Hydrate 80, left it for a while, sprayed some Dynax S-80 in the cavities that were accessible, then had a crack at the spare wheel carrier. No pics of this yet, but I gave it a quick buzz over with the drill & wire brush, and have since given both sides a single coat of Hydrate. I'd had the arches waxoyled shortly after I got the car, so about a year ago, the Hydrate wasn't too keen on going over the Waxoyl, but I couldn't be bothered trying to remove it, and think it should be fine.

All being well, I won't need the car until later this week, currently, and subject to weather, the plan is to give the boot floor / arches a coat of Dynax UB tomorrow evening, followed by a second on Tuesday evening. Spare wheel tray should get a second coat of Hydrate tomorrow evening, then maybe just one coat of Dynax.

Comments welcome, as always.
2005 Vauxhall VX220 Turbo
2000 Ford Focus 1.6i Ghia
2006 Renault Clio 2.0i RenaultSport 197 - SOLD
2005 Honda CR-V 2.0i Executive auto
2001 Ford Puma 1.7i Black

#50 User is offline   happy-kat 

  • Group: Admin
  • Posts: 21811
  • Joined: 10-February 03

Posted 12 October 2009 - 04:53 PM

I am surprised at the rust where the brake line fixing is, you would think this would get treated before sticking that plate on, I wonder if it is a dissimilar metal reaction causing that much rust.
Your springs are very tidy. :)
A job being done well and in time too :) a lot more rust on your edge bottoms than mine on the arches.
searching is fruitful | I'm a sponge not a mechanic | please do try that if stuck with a Puma problem whilst waiting for a reply | For the Puma fan this read 'The Inside Story Book' is very nice to own sometimes still seen for sale

#51 User is offline   FlashBastd 

  • Group: Validating
  • Posts: 3900
  • Joined: 17-August 08
  • Location:West Yorks

Posted 12 October 2009 - 10:01 PM

Thanks, springs were new in Jan!

Rust on my inner wing isn't much worse than Rick's, aside from the brake line mounting.

This evening I have given the rear arches and boot floor two coats of Dynax UB, then got carried away with the S50 doing the cavities from under the car.

I got absolutely filthy!

All being well, I will give it another coat of UB tomorrow night, then I can get the rear end put back together, for now at least.

Next will probably be to do each side, one side at a time, in as far as the heat shield. The area behind the heat shield, and the area behind the fuel tank, will have to wait until I can get it on a lift.

How crazy would it be to remove the front wings to access the area behind?
2005 Vauxhall VX220 Turbo
2000 Ford Focus 1.6i Ghia
2006 Renault Clio 2.0i RenaultSport 197 - SOLD
2005 Honda CR-V 2.0i Executive auto
2001 Ford Puma 1.7i Black

#52 User is offline   happy-kat 

  • Group: Admin
  • Posts: 21811
  • Joined: 10-February 03

Posted 13 October 2009 - 07:37 PM

My front wings are staying on so have not looked into a removal process.
That must be a set of overalls for the bin then when you have finished as this stuff does not wash out I have found. I have a trashed set yoo ;)
searching is fruitful | I'm a sponge not a mechanic | please do try that if stuck with a Puma problem whilst waiting for a reply | For the Puma fan this read 'The Inside Story Book' is very nice to own sometimes still seen for sale

#53 User is offline   YOG 

  • Group: Members
  • Posts: 2929
  • Joined: 30-August 07
  • Location:West Sussex

Posted 13 October 2009 - 09:51 PM

Was there a redesign on the rear brake lines, as yours has a different layout to mine, or is it because of the discs? My lines also appear to have some type of coating on them.

Posted Image

Posted Image

I'm thinking of painting the spare wheel carrier, as otherwise the tyre may stick to it.
Rick

The Haynes Fiesta Manual (3397) can answer a lot of your questions.
Posted Image

#54 User is offline   FlashBastd 

  • Group: Validating
  • Posts: 3900
  • Joined: 17-August 08
  • Location:West Yorks

Posted 13 October 2009 - 10:30 PM

Brake lines are the same, the different bit is the FRP rear brake lines.

I have given my spare wheel carrier two coats of Hydrate, and now one coat of UB. Might give it another coat of UB if I get chance. If it does stick, it will soon come off.

I have given the arches and boot floor a third coat of UB this evening, nearly used a whole can, just on the rear arches and boot floor!
2005 Vauxhall VX220 Turbo
2000 Ford Focus 1.6i Ghia
2006 Renault Clio 2.0i RenaultSport 197 - SOLD
2005 Honda CR-V 2.0i Executive auto
2001 Ford Puma 1.7i Black

#55 User is offline   happy-kat 

  • Group: Admin
  • Posts: 21811
  • Joined: 10-February 03

Posted 14 October 2009 - 10:16 AM

Do you find it is no thicker to paint with then say golden syrup please?
searching is fruitful | I'm a sponge not a mechanic | please do try that if stuck with a Puma problem whilst waiting for a reply | For the Puma fan this read 'The Inside Story Book' is very nice to own sometimes still seen for sale

#56 User is offline   YOG 

  • Group: Members
  • Posts: 2929
  • Joined: 30-August 07
  • Location:West Sussex

Posted 14 October 2009 - 11:00 AM

Mines a bit like double cream (standard, not the "extra thick" version), or real gloss paint (again, not the thick "one-coat" version), it's quite runny.
I find that when putting subsequent coats on, its best to brush across once only, as going backwards and forwards over the same area reactivates coating/coatings underneath and thins them all out.
Rick

The Haynes Fiesta Manual (3397) can answer a lot of your questions.
Posted Image

#57 User is offline   FlashBastd 

  • Group: Validating
  • Posts: 3900
  • Joined: 17-August 08
  • Location:West Yorks

Posted 14 October 2009 - 11:07 AM

I concurr, it wasn't especially thick. I heated it up in hot water this time, which made it quite runny, but even when it had been outside for circa 45min, it wasn't that thick.

As Rick said, probably more like a gloss paint, good analagy.
2005 Vauxhall VX220 Turbo
2000 Ford Focus 1.6i Ghia
2006 Renault Clio 2.0i RenaultSport 197 - SOLD
2005 Honda CR-V 2.0i Executive auto
2001 Ford Puma 1.7i Black

#58 User is offline   happy-kat 

  • Group: Admin
  • Posts: 21811
  • Joined: 10-February 03

Posted 14 October 2009 - 12:19 PM

Looks like it is consitent in it's consitency.
I think I have applied mine over the 100 microns suggested on the bumf, hey hum :)
searching is fruitful | I'm a sponge not a mechanic | please do try that if stuck with a Puma problem whilst waiting for a reply | For the Puma fan this read 'The Inside Story Book' is very nice to own sometimes still seen for sale

#59 User is offline   FlashBastd 

  • Group: Validating
  • Posts: 3900
  • Joined: 17-August 08
  • Location:West Yorks

Posted 15 October 2009 - 08:58 AM

Having given the Dynax UB 24hrs to dry (cure?), last night I refitted the wheel arch liners, got the drivers one in before it occurred to me that I should take some pics, so below are pics of the passenger side rear arch and the boot floor;

Passenger side rear wheel house

Posted Image

Posted Image

Posted Image

Posted Image

Underside of the boot floor

Posted Image

Posted Image

Posted Image

Posted Image

Posted Image

Haven't refitted the spare wheel carrier yet, it has had 2 coats of UB, I plan to give the underside a third coat before refitting.

With the liners refitted, I could drop the car from the axle stands and park it a bit more tidily, 3 cars at home at the moment and because the Puma was preventing access to part of the driveway, it was a bit snug.

With it off the stands I gave it a quick wash and clayed the windows, it could do with a polish, especially on the repaired rear quarter, but it was too damp by the time I had finished at circa 10pm last night.

Jobs planned in the short term;

Front doors
Replace front speakers
Possibly replace drivers mirror for another in better condition
Sound deadening
Dynax S50

Dash
Swap heater control panel for one without power outlet
Replace Nokia pop-port cable
Fit accessory power socket to glove compartment

Front suspension
Fit Zetec-S anti-roll bar, with new bushes and drop links
Fit ST170 calipers, new discs, Apex pads
Possibly replace one of the wheel hubs. There is a vibration under braking which feels like a warped disc, but could be a slightly damaged hub.

Underbody
Repair / straighten seams between floor pan and side panels
Remove exhaust, heat shields, fuel tank and rustproof underside with Hydrate and Dynax. If I'm lucky, I might get the FRP tailpipe welded on at the same time.

Bodywork
Needs a damn good polish

As ever, comments welcome!
2005 Vauxhall VX220 Turbo
2000 Ford Focus 1.6i Ghia
2006 Renault Clio 2.0i RenaultSport 197 - SOLD
2005 Honda CR-V 2.0i Executive auto
2001 Ford Puma 1.7i Black

#60 User is offline   happy-kat 

  • Group: Admin
  • Posts: 21811
  • Joined: 10-February 03

Posted 15 October 2009 - 07:18 PM

I think Rick mentioned that the seam gaps may be derliberate drain holes for the sills.
Not sure how far Rick got with seeing if any wax drained from these areas from the inside.

What would you use to reseal the door weatherstrip if the stickiness is not good enough when you remove it?
searching is fruitful | I'm a sponge not a mechanic | please do try that if stuck with a Puma problem whilst waiting for a reply | For the Puma fan this read 'The Inside Story Book' is very nice to own sometimes still seen for sale

Share this topic:


  • 13 Pages +
  • 1
  • 2
  • 3
  • 4
  • 5
  • Last »
  • You cannot start a new topic
  • You cannot reply to this topic