
 Help
Help


youve misread me graham. the carbon parts are plenty strong enough as they are. A cage has 2 important functions, stiffening the car for handling and occupant safety in a crash. A standard puma multipoint from custom cages weighs 56kg in cds and 43kg in t45. You can loose that in metal off the shell relatively easily.
less weight is free power. stripping the interior is free, add a cage and seats and im looking at 4k spend and ill have a car that weighs just under a ton so a tweak of boost and 400bhp/ton and on a light shell the transmission will be fine.
or
increase the power which means uprated transmission if i want much over 400bhp. ie £4k for good gearset, £1k to build into casing with new bits, almost £1k on front diff, £500 on 7.5" upgrade rear, £1k on uprated shafts, £500 on clutch £300 on hydraulic clutch conversion. so almost £9k by the time its all fitted up. And lets not forget going to 450bhp would probably cost me £500 plus a few hours mapping. So spend almost £10k to still get about 400bhp/ton (car weighs 1100kg as is).
so its much cheaper to go the lightweight option in the first instance.
weights based on having carbon panels anyway.
24V V6 Cosworth Puma Project
Rate Topic:
 5 Votes
#581

- Group: Members
- Posts: 4142
- Joined: 22-January 04
- Location:Stoke on Trent
Posted 06 April 2011 - 10:52 PM
#582

- Group: Moderators
- Posts: 4071
- Joined: 20-March 05
- Location:Chippenham and Beyond
Posted 07 April 2011 - 06:20 AM
I see more where you are coming from now Warren 
Next Question is what you are going to do with this Beast when it is developing around 400 BHP per ton?
The Chap with the Scooby (Marcus) does trackday galore with his. It was at Combe two weeks ago and there again for Spring action day this Saturday being taken around the track. He uses it as a everyday drive so apart from a cage, it still have a full interior and sound proofing.
The Speedo goes to 160mhp in a Scooby and he has had his around to the P in MPH So it is VERY quick even with the weight it carries.
Stealth looking for over 400 BHP

Next Question is what you are going to do with this Beast when it is developing around 400 BHP per ton?
The Chap with the Scooby (Marcus) does trackday galore with his. It was at Combe two weeks ago and there again for Spring action day this Saturday being taken around the track. He uses it as a everyday drive so apart from a cage, it still have a full interior and sound proofing.
The Speedo goes to 160mhp in a Scooby and he has had his around to the P in MPH
So it is VERY quick even with the weight it carries. Stealth looking for over 400 BHP
MK4 XR3i
Mk3 XR3i
R Reg 1.7 Puma
T Reg 1.7 Lux Puma
Now its Racing Puma 072
Graham

Mk3 XR3i
R Reg 1.7 Puma
T Reg 1.7 Lux Puma
Now its Racing Puma 072
Graham
#583

- Group: Members
- Posts: 583
- Joined: 01-April 10
- Location:NW Scotland Highlands
Posted 07 April 2011 - 10:21 AM
Hi Warren,
Yes there is a profile cutting jig available but they are expensive, a pain to set up and as the angles the tubes mate at all vary, it will always need altering
What I do is cut card templates from old bog roll inners and use a 4" Grinder, with care they come out perfect.
I think MIG welding is a doddle, compared to soldering, you just need to set the machine up right, which is easy with a test piece,.................
Use about 120 amps for 3 - 6 mm steel and then start to weld on the test piece whilst twisting the feed knob until it welds smoothly, (you will tell this by the sound it makes) !!
Note all your settings in the beginning until you learn them off pat.
You want to use as much current as you can without burning holes, for good penetration. 0.6 wire for thin bodywork welding, 0.8 wire for rollcage type jobs (3 to 6 mm thick steel).
If welding overhead and it's "balling back on you" , up the wire feed a little Gas flow around 2.5 l / min for most stuff doing the job inside a sheltered building, and if welding outside in windy conditions up the gas flow a bit
Have a look on the MIG welding forum for tips on getting started
Cheers Dave
Yes there is a profile cutting jig available but they are expensive, a pain to set up and as the angles the tubes mate at all vary, it will always need altering
What I do is cut card templates from old bog roll inners and use a 4" Grinder, with care they come out perfect.
I think MIG welding is a doddle, compared to soldering, you just need to set the machine up right, which is easy with a test piece,.................
Use about 120 amps for 3 - 6 mm steel and then start to weld on the test piece whilst twisting the feed knob until it welds smoothly, (you will tell this by the sound it makes) !!
Note all your settings in the beginning until you learn them off pat.
You want to use as much current as you can without burning holes, for good penetration. 0.6 wire for thin bodywork welding, 0.8 wire for rollcage type jobs (3 to 6 mm thick steel).
If welding overhead and it's "balling back on you" , up the wire feed a little
Gas flow around 2.5 l / min for most stuff doing the job inside a sheltered building, and if welding outside in windy conditions up the gas flow a bit Have a look on the MIG welding forum for tips on getting started
Cheers Dave
It's nice to be important but it's more important to be nice !!
#584
- Group: Members
- Posts: 4142
- Joined: 22-January 04
- Location:Stoke on Trent
Posted 07 April 2011 - 04:32 PM
 Dogsbody, on 07 April 2011 - 06:20 AM, said:
Next Question is what you are going to do with this Beast when it is developing around 400 BHP per ton?
The Speedo goes to 160mhp in a Scooby and he has had his around to the P in MPH So it is VERY quick even with the weight it carries.
The Speedo goes to 160mhp in a Scooby and he has had his around to the P in MPH
So it is VERY quick even with the weight it carries. go on trackdays regularly is the long term plan. I wont be a poor student when the car is finished.
160mph isnt that much TBH. Ive had almost 155mph on a "private test track" on gps with a few miles run up before i backed off. The hard bit is getting to 160mph in the confines of a circuit on a long straight. That would be a real achievement.
Dave2302, on 07 April 2011 - 10:21 AM, said:
What I do is cut card templates from old bog roll inners and use a 4" Grinder, with care they come out perfect.
I think MIG welding is a doddle, compared to soldering, you just need to set the machine up right, which is easy with a test piece,.................
I think MIG welding is a doddle, compared to soldering, you just need to set the machine up right, which is easy with a test piece,.................
LOL i thought youd do something like bog rolls after your plumbing pipe cage mock up!!
i presume anything made by "clarke" or "halfrauds" is a heap of junk best avoided for mig welding.
#585
- Group: Moderators
- Posts: 4071
- Joined: 20-March 05
- Location:Chippenham and Beyond
Posted 07 April 2011 - 07:07 PM
I,m on my second Maypole mig welder. Wasn,t that expensive and its been good to me for about 12 years now. Paid for itself numerous times over. I use pubgas co2 which dosent give as good a weld as say argonshield, but at 15 quid a bottle i,m happy. Welding alloy you will need pure argon, so i do that at work..... any thing over about 3mm thick, i tend to arc weld with my sip 160. Why not book your self on an evening collage course Warren. I learnt gas and arc at collage, and taught my self mig after tearing the back axle out of an escort on a road rally. I had over cooked a slot left, so grabbed the handbrake at about 60mph to turn the car around. Just too much strain on a tired shell. I tore out a front leaf spring mount. Lol.
MK4 XR3i
Mk3 XR3i
R Reg 1.7 Puma
T Reg 1.7 Lux Puma
Now its Racing Puma 072
Graham
Mk3 XR3i
R Reg 1.7 Puma
T Reg 1.7 Lux Puma
Now its Racing Puma 072
Graham
#586
- Group: Members
- Posts: 583
- Joined: 01-April 10
- Location:NW Scotland Highlands
Posted 07 April 2011 - 07:11 PM
warrenpenalver, on 07 April 2011 - 04:32 PM, said:
I presume anything made by "clarke" or "halfrauds" is a heap of junk best avoided for mig welding.
Yeah, Clarke, Halfrauds, Sealey, Cebora etc etc best avoided...............
Like a Stereo, you get what you pay for with welding equipment, go to a local welding equipment specialist who's been in business a while and see what they recommend, around 800 quid.............
Like I said, ESAB, BOC Murex, something like that is good
Cheers Dave
It's nice to be important but it's more important to be nice !!
#587
- Group: Members
- Posts: 4142
- Joined: 22-January 04
- Location:Stoke on Trent
Posted 07 April 2011 - 10:03 PM
cool, so a decent mig will weld roll cage tube ok then. Someone said i would need to tig it to get the best penetration. But surely if a mig is rated to weld say 5-6mm metal then 2mm cds tube is piss easy??
dogsbody arent the big bottles better value for money by a long way??
I looked into courses but my local colleges have withdrawn most evening courses let alone evening welding. Guess in a city where unemployment is running at near 50% in the real world then there isnt enough demand for evening courses let alone funding. Plus a significant number of those people are the "refuse to work" benefit scrounger lot.
#588
- Group: Members
- Posts: 583
- Joined: 01-April 10
- Location:NW Scotland Highlands
Posted 08 April 2011 - 10:05 AM
I weld up to 10mm thick steel with mine (300 amp)............. It's true that a tig will give neater welding in the right hands, and is much better on stainless and ally, bu a Mig will do steel nealy with practice and both give good penetration. MIG also does occasional Ally like I do
The big bottles are much better value, the pub ones are okay for bodywork, but not as neat and spit a lot Pub bottles don't last as long if you're doing a lot of welding.
My Argoshield bottle has done almost all the welding on my Puma, plus some and is still about 1/3 left. The last bottle not using all the time lasted 3 years LOL
MIG forum is good for advice and tips and has a beginner section, equipment section, etc
Cheers Dave
The big bottles are much better value, the pub ones are okay for bodywork, but not as neat and spit a lot
Pub bottles don't last as long if you're doing a lot of welding.My Argoshield bottle has done almost all the welding on my Puma, plus some and is still about 1/3 left. The last bottle not using all the time lasted 3 years LOL
MIG forum is good for advice and tips and has a beginner section, equipment section, etc
Cheers Dave
It's nice to be important but it's more important to be nice !!
#589
Posted 08 April 2011 - 10:55 PM
try your local BOC dealer,they sell anything and everything to do with welding equipment...
#590
Posted 12 April 2011 - 06:40 AM
warren if ever you want to have a go at either MIG or TIG pop over to mine, i have both and im only in Nottingham.
to be fair TIG welding is something im just learning but i can MIG weld all day long.
i have an SIP 150 mig, it works fine on upto 6mm although i did swap the old torch liner to a better one as that is the main issue with cheap sets, the wire feed is pants.
TIG welding is better as you get good penetration but is expensive to A, set up and B, run. when your learning youll get through tungsten electrodes as youll keep touching down and having to dress them again.
also it uses pure argon, may last bottle was £137 but should last a fair while.
with mig if your only doing body work etc then you can use CO2 gas which is much cheaper.
just built a manifold for my MR2 with the tig set, for my first its turned out pretty well.
my other toy has 470bhp
#591
- Group: Members
- Posts: 583
- Joined: 01-April 10
- Location:NW Scotland Highlands
Posted 13 April 2011 - 04:55 PM
A bit more work done on the Puma, plus a bit of unwanted destruction 
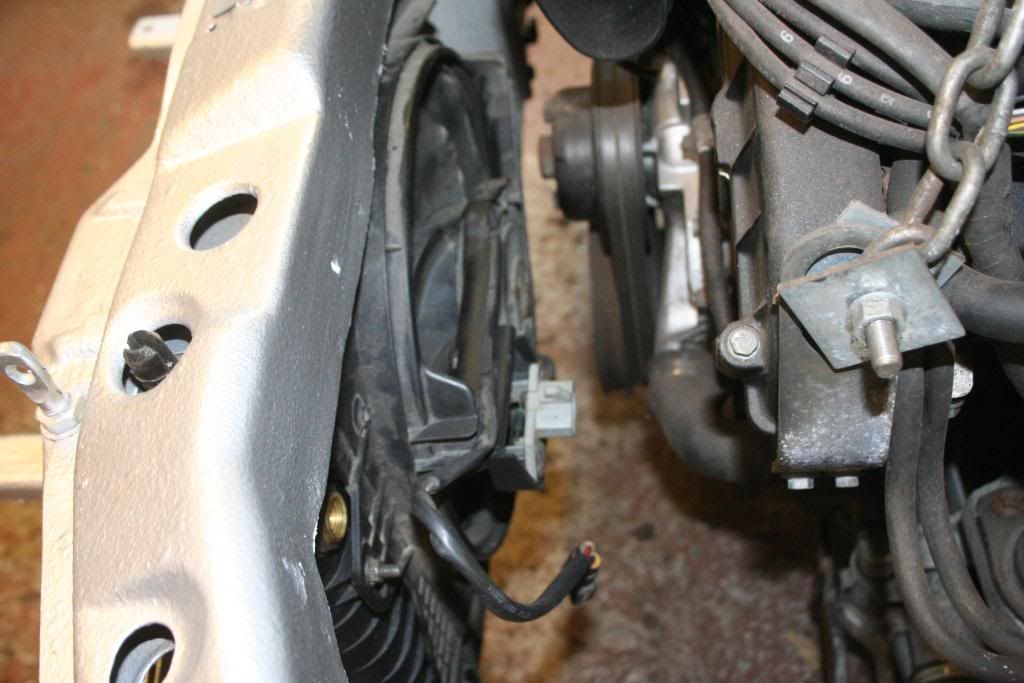
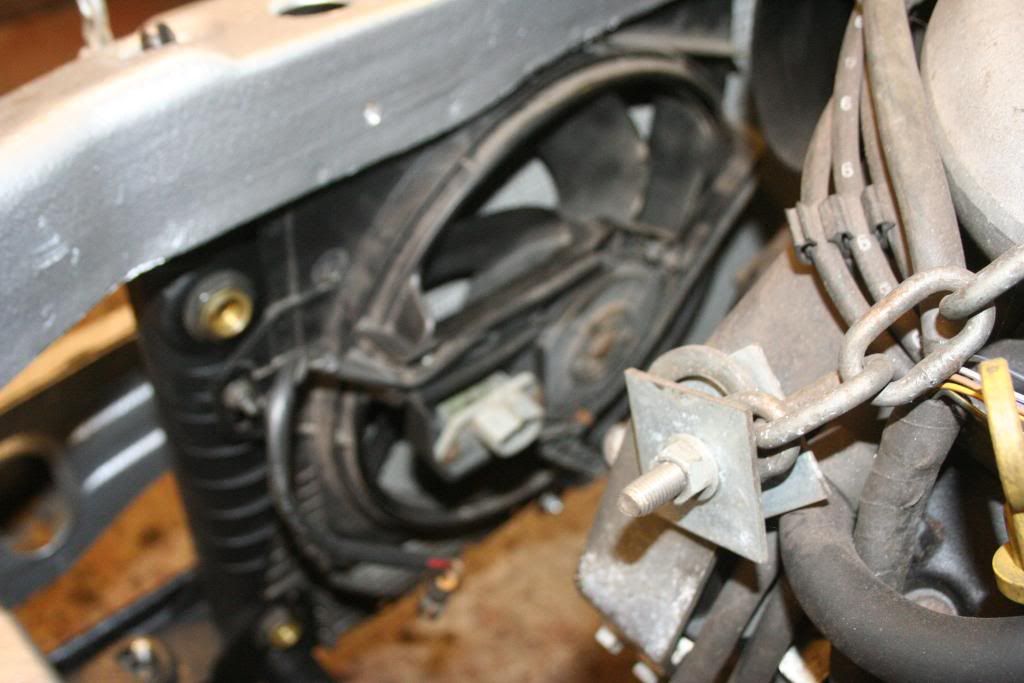
First up, finished the electric fan assembly and fitted it to the radiator.
The eagle eyed will spot that its a Scorpio fan, (thinner and fits the rad better) with the Puma's 2 speed resistor grafted on in the airflow. This means the original wiring and relays on the car can be used, with the slow and fast speeds switched by the Cosworth ECU...........
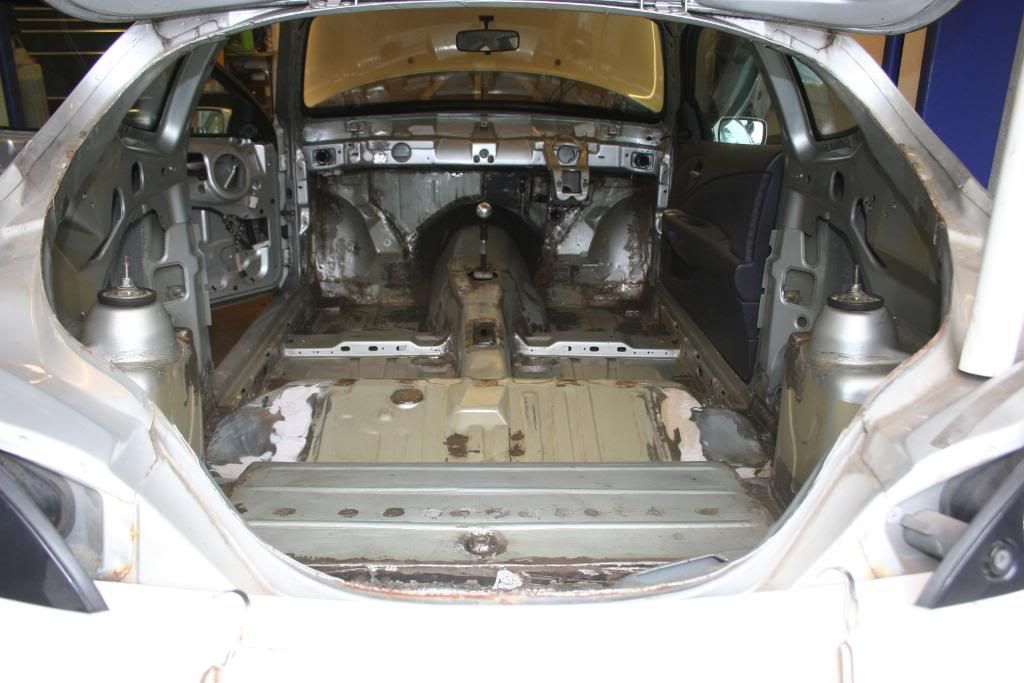
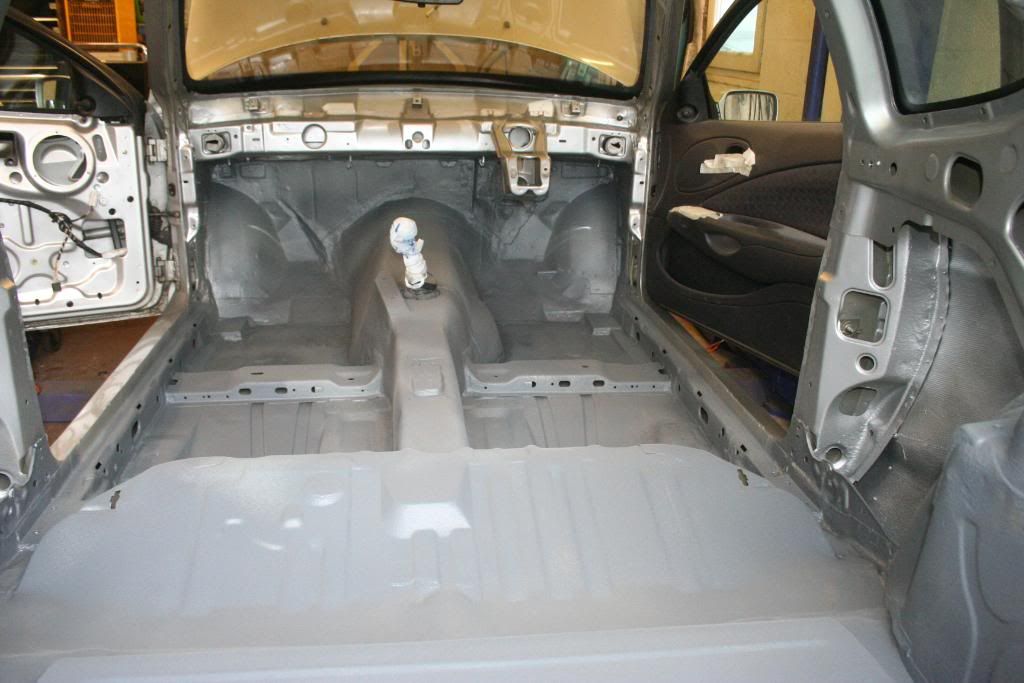
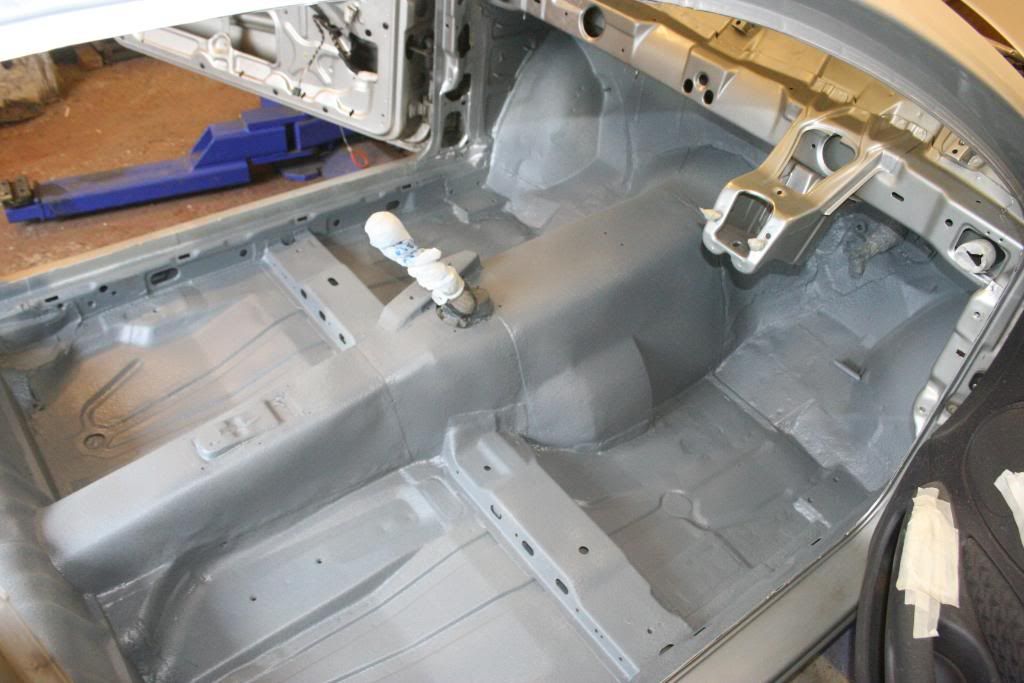
The last couple of days have been spent prepping the inside of the car for paint, here it is all cleaned out and ready for seam sealer and a coat of stonechip at floor level.........
Now I suppose I should have known better than doing any work today as it's the 13th, especially as the first thing I did this morning was to drop my phone in a bowl of water
Next disaster, tailgate of the Puma slips off it's temporary support and smashes the bonded in HRW glass, all over the ready to paint interior
...........
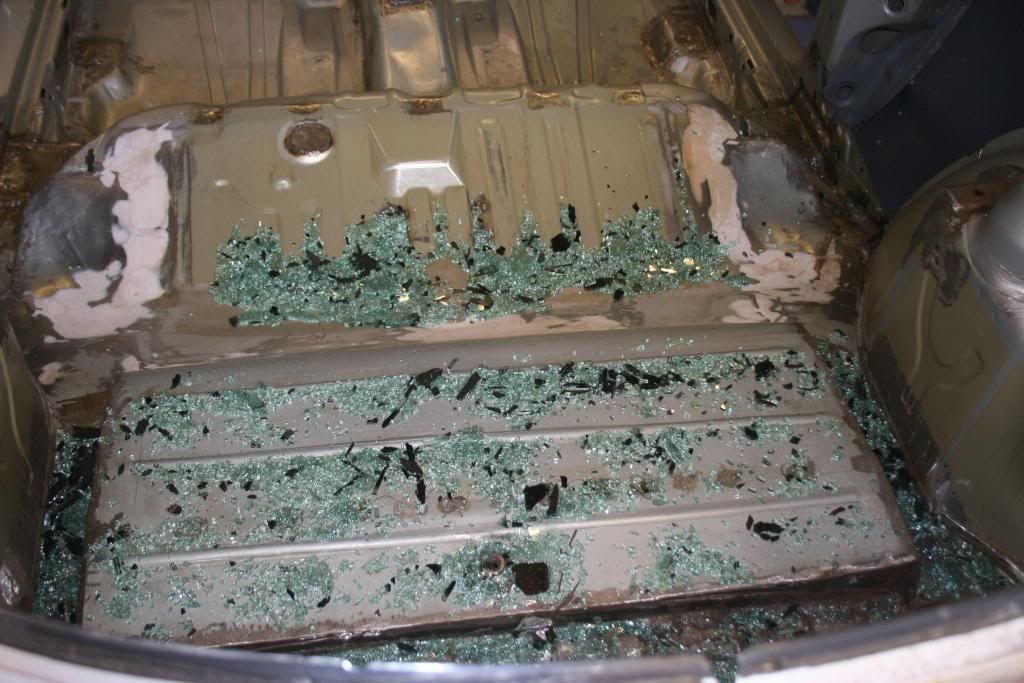
Bo11ox..............Oh well out with the hoover
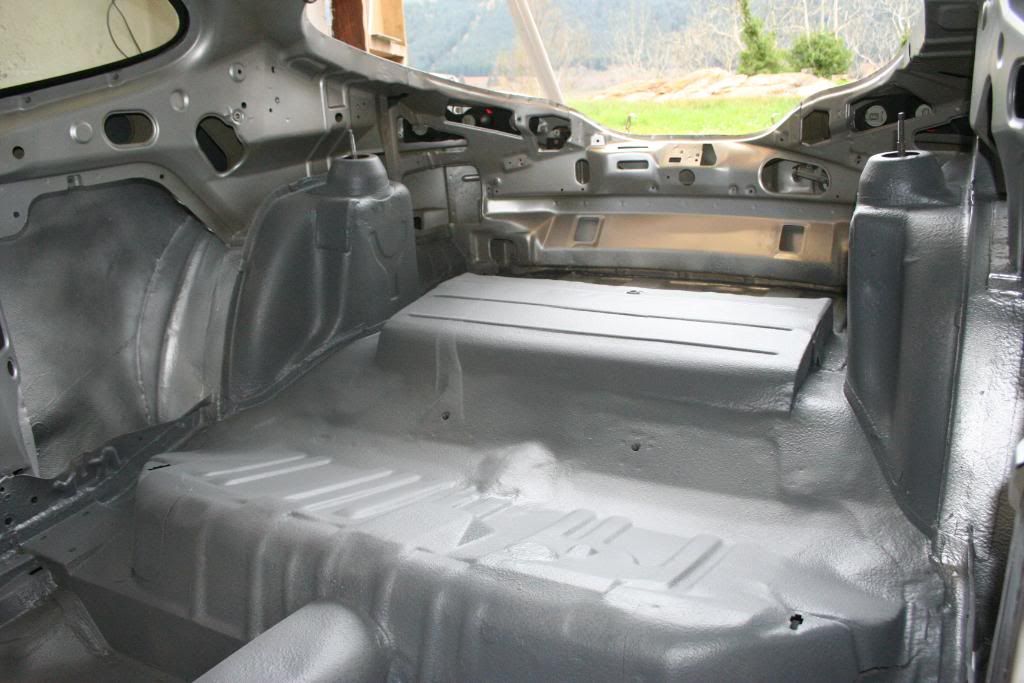
Well after hoovering out a few million pieces of glass, a wipe round all the welding with seam sealer and a couple of light coats of grey stonechip............
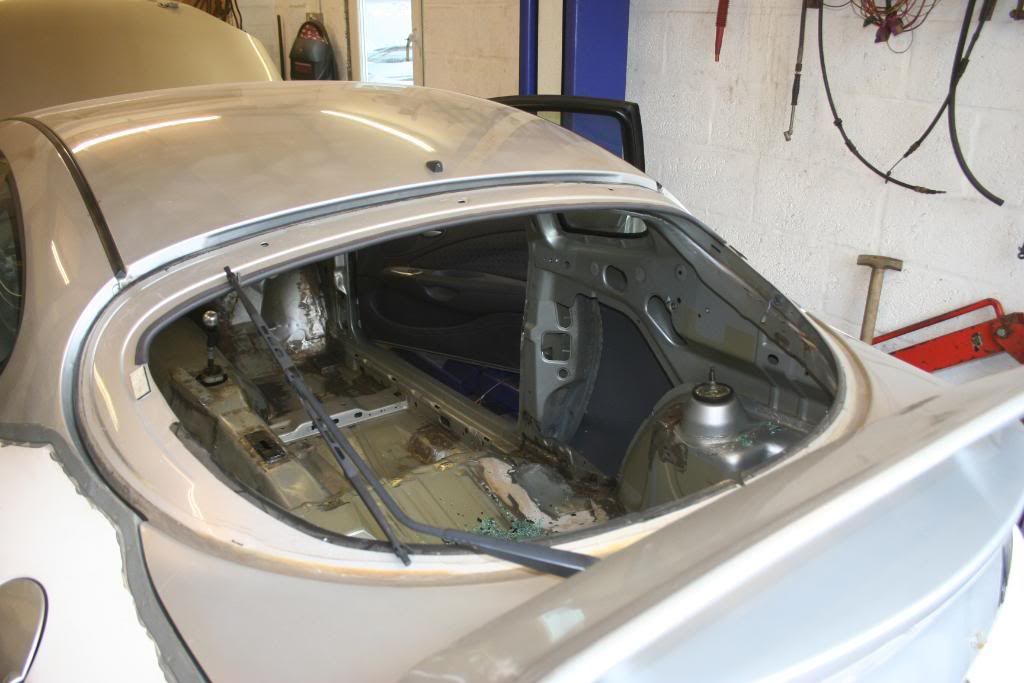
So that's the inside all ready for a top coat of silver...........Got to go away for a week or so so will put the top coat on when I get back.
Cheers for now,
Dave
First up, finished the electric fan assembly and fitted it to the radiator.
The eagle eyed will spot that its a Scorpio fan, (thinner and fits the rad better) with the Puma's 2 speed resistor grafted on in the airflow. This means the original wiring and relays on the car can be used, with the slow and fast speeds switched by the Cosworth ECU...........
The last couple of days have been spent prepping the inside of the car for paint, here it is all cleaned out and ready for seam sealer and a coat of stonechip at floor level.........
Now I suppose I should have known better than doing any work today as it's the 13th, especially as the first thing I did this morning was to drop my phone in a bowl of water
Next disaster, tailgate of the Puma slips off it's temporary support and smashes the bonded in HRW glass, all over the ready to paint interior
...........
Bo11ox..............Oh well out with the hoover
Well after hoovering out a few million pieces of glass, a wipe round all the welding with seam sealer and a couple of light coats of grey stonechip............
So that's the inside all ready for a top coat of silver...........Got to go away for a week or so so will put the top coat on when I get back.
Cheers for now,
Dave
It's nice to be important but it's more important to be nice !!
#592
Posted 13 April 2011 - 06:21 PM
Dave, what is this stonechip paint you are keen on using? Is it like an even more durable Hammerite? It looks good!
Pity about the rear glass, tempted by Polycarb replacement? I am considering one...
http://www.plastics4...-1-288-295-327/
(edit: I have enquired before and IIRC the rear only was about £120)
Pity about the rear glass, tempted by Polycarb replacement? I am considering one...
http://www.plastics4...-1-288-295-327/
(edit: I have enquired before and IIRC the rear only was about £120)
This post has been edited by Pat_T: 13 April 2011 - 06:22 PM
1.7L. ST150 clutch. Shawspeed lightened flywheel. Miltek exhaust manifold & full decat system. Pipercross foam cone filter. Speedline white 17" wheels. Toyo R888s. Weitec coilovers.
Powerflex rear beam bushes. Willwood 4-pots, 280mm dics & HEL braided hoses. Kenwood headunit. OMP: rear strut brace. Oddessy Racing 40 battery.
Corbeau Clubman seats. LUKE harnesses. FRP rear seats. Carbon fibre interior. FRP splitter.
Ultimate green. ~990kg...PROJECT THREAD
Powerflex rear beam bushes. Willwood 4-pots, 280mm dics & HEL braided hoses. Kenwood headunit. OMP: rear strut brace. Oddessy Racing 40 battery.
Corbeau Clubman seats. LUKE harnesses. FRP rear seats. Carbon fibre interior. FRP splitter.
Ultimate green. ~990kg...PROJECT THREAD
#593
- Group: Members
- Posts: 583
- Joined: 01-April 10
- Location:NW Scotland Highlands
Posted 14 April 2011 - 02:35 AM
Hi Pat,
Nah I will go for a new glass HRW as per stock.
The "stonechip" paint is like a textured primer that you can overpaint in body colour...............but it always remains slightly flexible so you can drop spanners or have stones hit it but it doesn't chip
Ideal for under bonnet and floorpans etc, once I've painted it all body colour (silver) inside, it will have "Ally Chequer Plate "mats' in the front as a wearing surface where feet go
Cheers Dave
It's nice to be important but it's more important to be nice !!
#594
- Group: Members
- Posts: 583
- Joined: 01-April 10
- Location:NW Scotland Highlands
Posted 26 April 2011 - 08:21 AM
Hi all,
Just returned from a trip down south, visited all my old haunts whilst there
A very worthwhile excrsise..........................
I have returned having now sourced 3.9 front diff, 7.5" Rear LSD unit, and a 4.27 7.5" Rear diff (for use in 2wd mode), plus ally chequer plate etc etc so have plenty to be getting on with now....................
More updates soon, after I've sorted the myriad of post, phone calls and bank transfers etc that always need to be done when one returns from a week away LOL
Cheers Dave
This post has been edited by Dave2302: 26 April 2011 - 08:25 AM
It's nice to be important but it's more important to be nice !!
#595
- Group: Members
- Posts: 583
- Joined: 01-April 10
- Location:NW Scotland Highlands
Posted 08 May 2011 - 10:56 AM
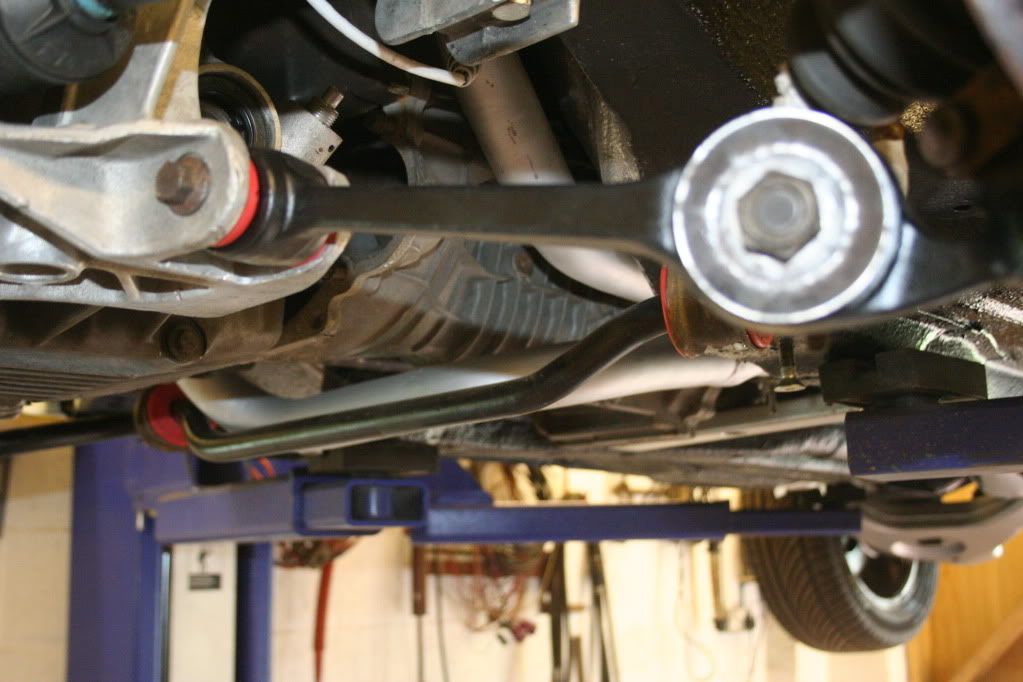
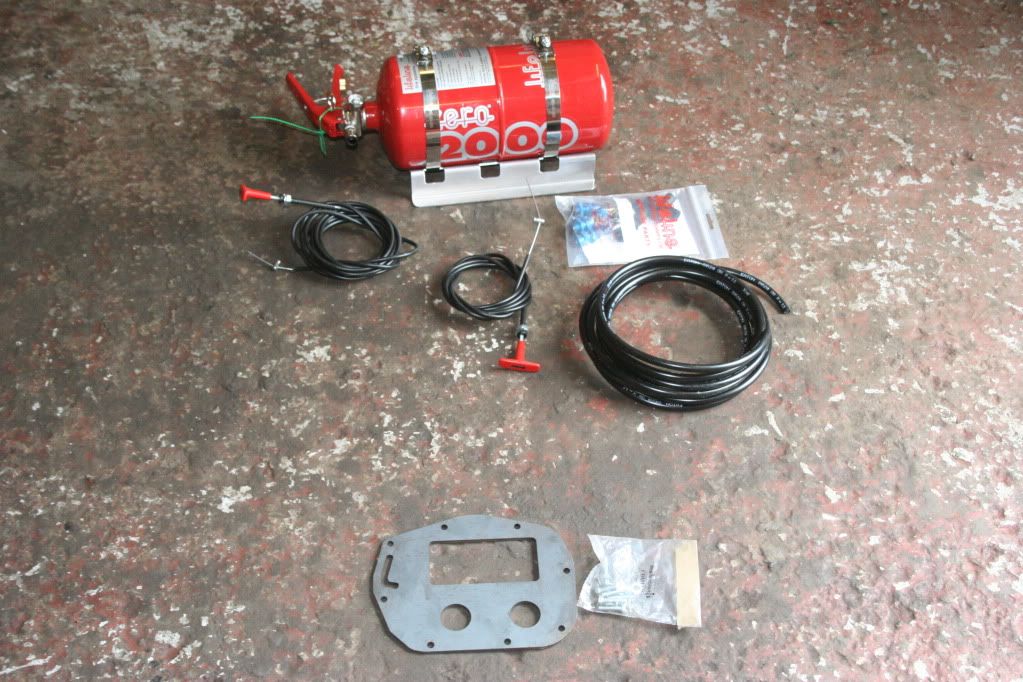
Another small update............
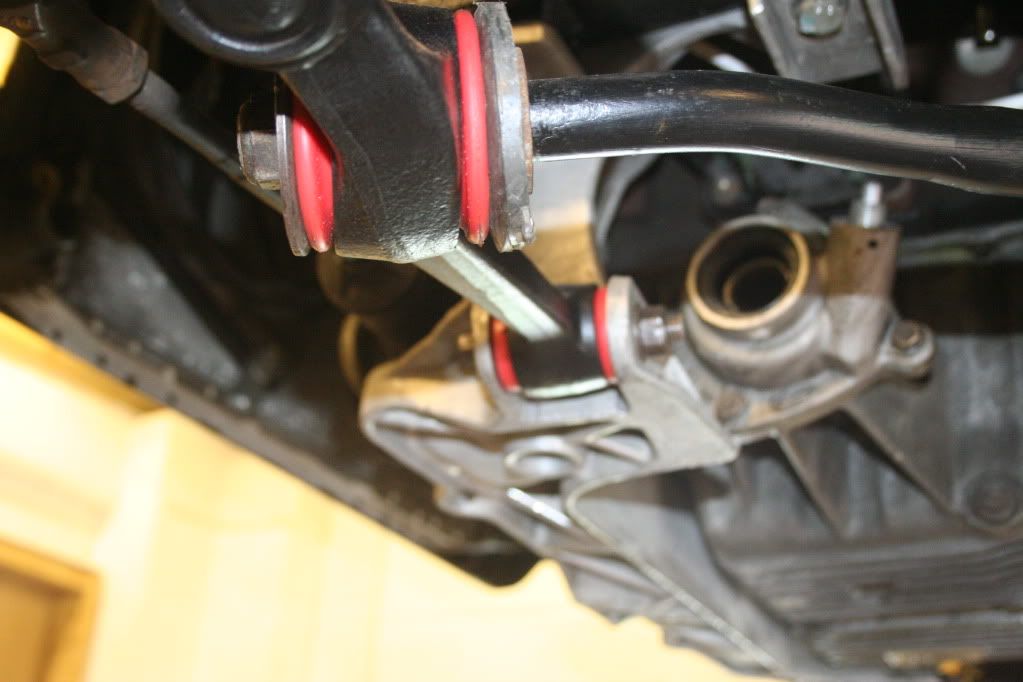
Fitted the new lower TCA's and Poly Bushes to the front end.................
Next this little lot arrived via the donkey express, Plumbed in Fire System and a Front Diff Re-Inforcing Plate, (front diffs can break on the Sierra 4X4 set up, because the casings spread under load), these little beautys stop all that nonsense and allow you to bung around 800hp through them
..................
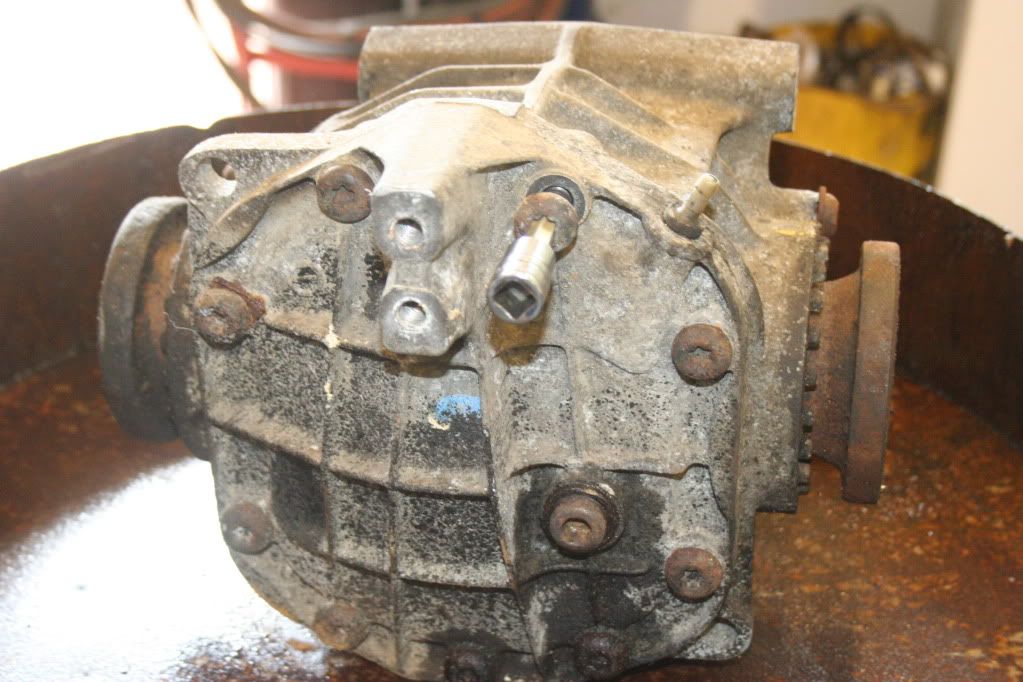
Whilst on the subject of diffs.........Rears..........I'm using the Scorpio Cosworth rear end on this car, which has the stronger 7.5" diffs, as opposed to the 7" fitted on 4x4 Sierra's.............this means 4x4 Sierra LSD units are no good to me.
Time for some 7.5" hybrid diffs LOL.............
The only 7.5" diffs fitted with LSD units as stock were 2WD Sierra Cosworth and MkIII Granada Cosworth, and these were mostly all 3.6:1 ratio.
As I want outright acceleration and don't need a top speed of 160 MPH I have decided that 3.9:1 for stages in 4X4 mode, and a 4.27:1 for 2WD mode is the way to go. These are available in 7.5" from 2.3 Scorpio and 2.0 16V Scorpio, but without LSD's..............
So I've been round the country buying up loads of 7.5" Diffs, firstly the non LSD ones with the right ratios and then some 3.6's with LSD units, to strip and build into the diffs with the right ratio. I've also procured a couple of 3.9 Front diffs which are getting hard to find now as they were only fitted in 2.0
4X4 Sierras.
Here's how they come apart............
It all sonds easy, but in practice some of the Torx Bolts can be VERY tight and need the torx bit banging in deep to stop them rounding off
First up remove all the rear cover bolts and remove the rear cover............
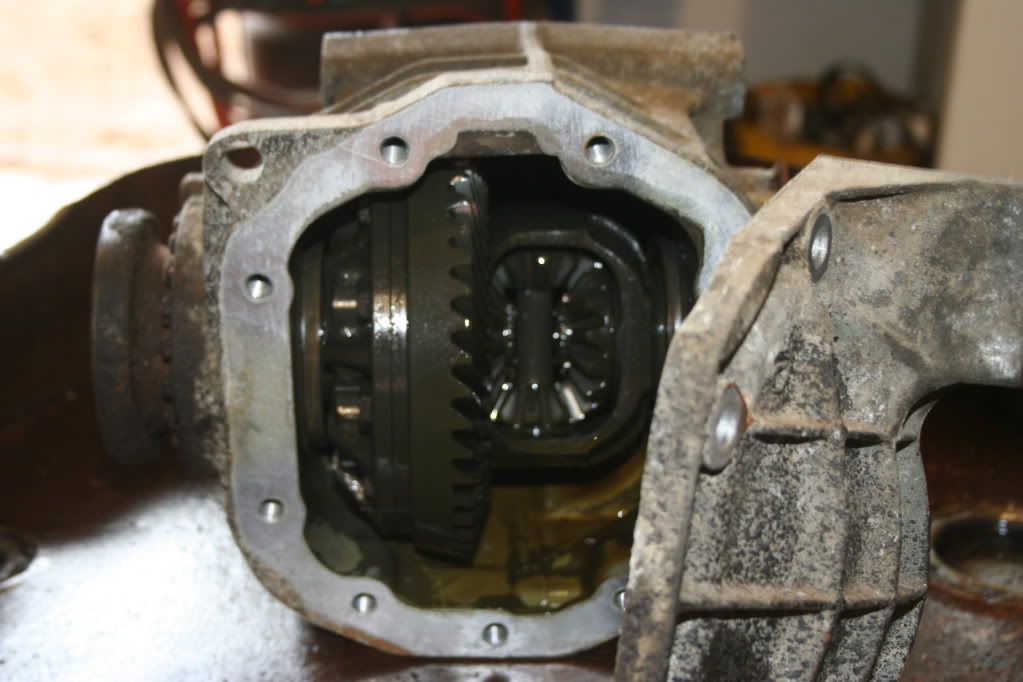
Next knock out the 2 circlips which hold the driveshaft flanges into the diff planet gears................
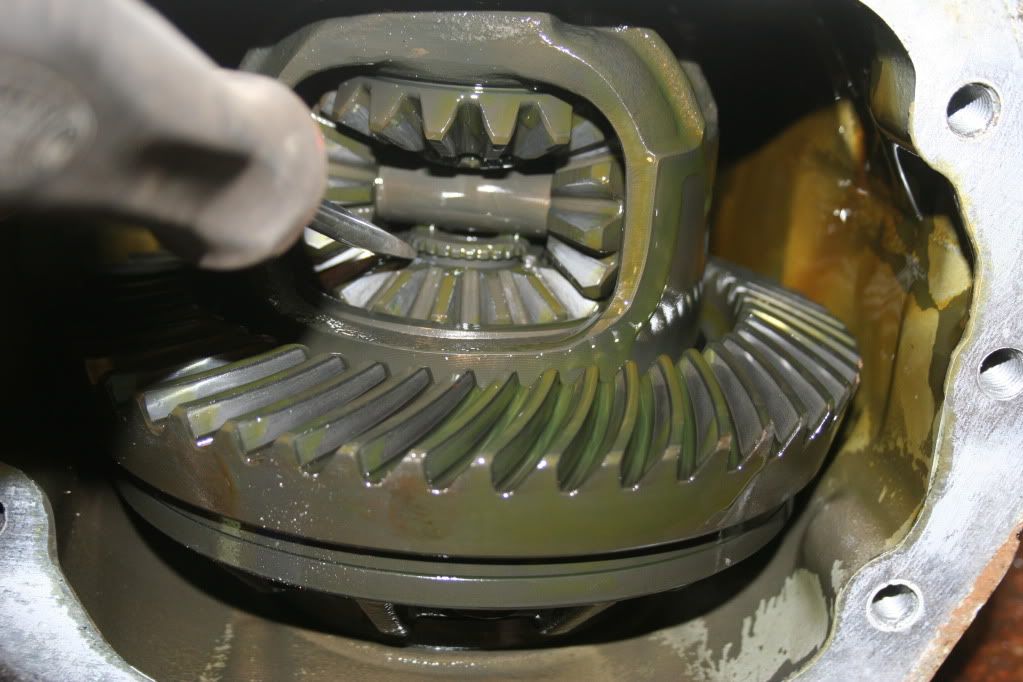
And the other..............
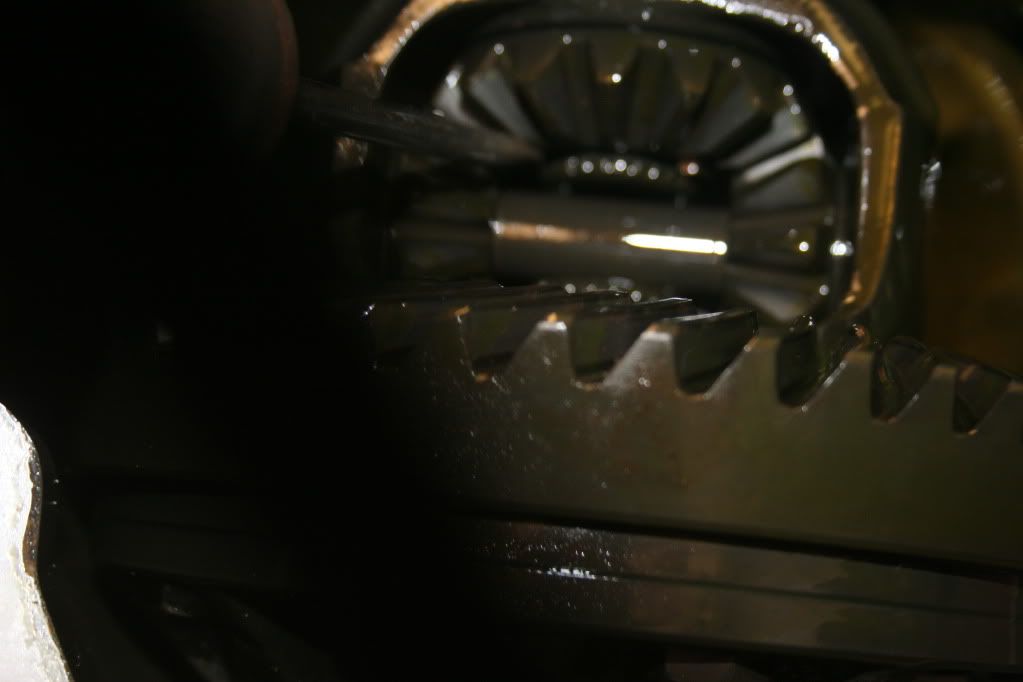
A tap on the flanges and out they come............
Now I need to undo the 2 locking plates that lock the big "Castellated" bearing carriers which are screwed into the side of the diff case, one each side...............

Now to undo the bearing carriers, I have a tool for these, but normally a bit of flat bar across the castles to turn them anticlockwise will do the job.
The diff I was stripping was a bugger, one of these was very tight in the case............It's no good tapping on the 'castles' becase they just snap off, but there are some slots inside these near the oil seal which will stand up to tapping with a punch...............

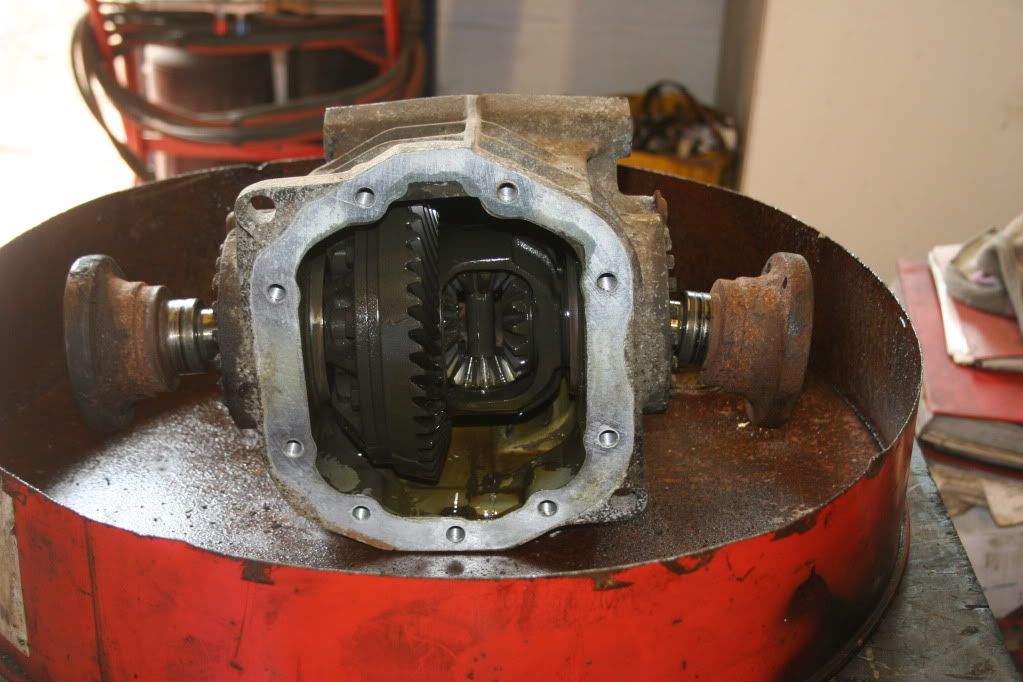
Once these are out the diff and crownwheel can be slid over to one side and tilted out of the case, there is a knack to this, it looks like it won't come out, then just as you start swearing it will drop out LOL............
 ...............
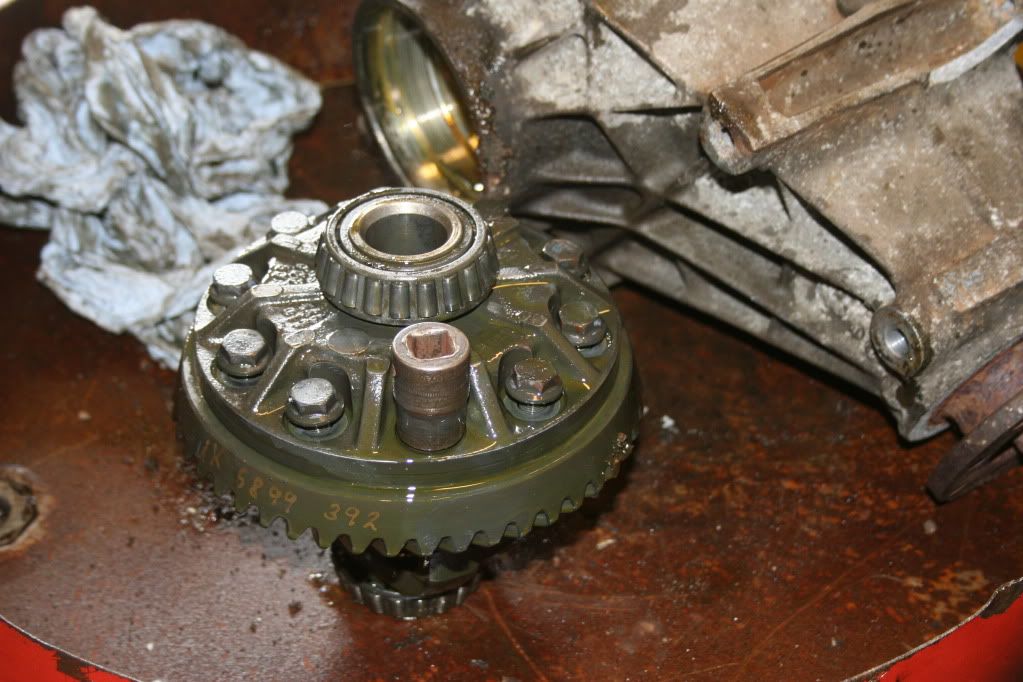
Undo the crownwheel bolts shown above, and tap the crownwheel off the diff assembly, and this is what I end up with.................
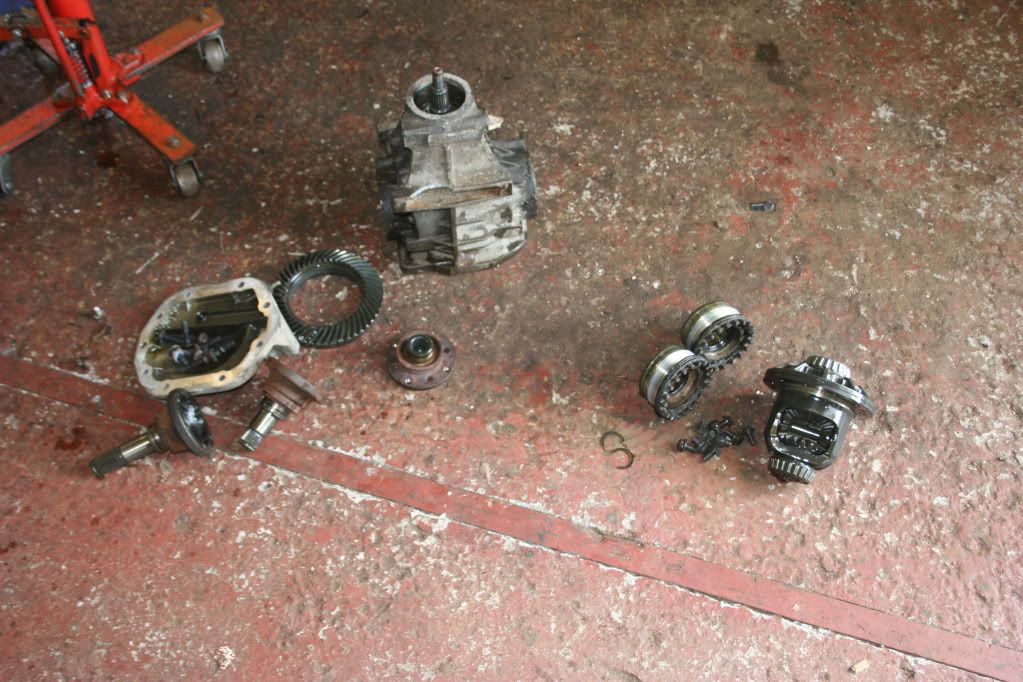
These are the bits that are needed, LSD Diff, Crownwheel Bolts, Bearing carriers and Flange Circlips.............

Next thrilling instalment building it all into a diff that has the correct ratio, and should be finishing the rollcage and fitting up the inside of the car.
Cheers Dave
Fitted the new lower TCA's and Poly Bushes to the front end.................
Next this little lot arrived via the donkey express, Plumbed in Fire System and a Front Diff Re-Inforcing Plate, (front diffs can break on the Sierra 4X4 set up, because the casings spread under load), these little beautys stop all that nonsense and allow you to bung around 800hp through them
..................
Whilst on the subject of diffs.........Rears..........I'm using the Scorpio Cosworth rear end on this car, which has the stronger 7.5" diffs, as opposed to the 7" fitted on 4x4 Sierra's.............this means 4x4 Sierra LSD units are no good to me.
Time for some 7.5" hybrid diffs LOL.............
The only 7.5" diffs fitted with LSD units as stock were 2WD Sierra Cosworth and MkIII Granada Cosworth, and these were mostly all 3.6:1 ratio.
As I want outright acceleration and don't need a top speed of 160 MPH I have decided that 3.9:1 for stages in 4X4 mode, and a 4.27:1 for 2WD mode is the way to go. These are available in 7.5" from 2.3 Scorpio and 2.0 16V Scorpio, but without LSD's..............
So I've been round the country buying up loads of 7.5" Diffs, firstly the non LSD ones with the right ratios and then some 3.6's with LSD units, to strip and build into the diffs with the right ratio. I've also procured a couple of 3.9 Front diffs which are getting hard to find now as they were only fitted in 2.0
4X4 Sierras.
Here's how they come apart............
It all sonds easy, but in practice some of the Torx Bolts can be VERY tight and need the torx bit banging in deep to stop them rounding off
First up remove all the rear cover bolts and remove the rear cover............
Next knock out the 2 circlips which hold the driveshaft flanges into the diff planet gears................
And the other..............
A tap on the flanges and out they come............
Now I need to undo the 2 locking plates that lock the big "Castellated" bearing carriers which are screwed into the side of the diff case, one each side...............
Now to undo the bearing carriers, I have a tool for these, but normally a bit of flat bar across the castles to turn them anticlockwise will do the job.
The diff I was stripping was a bugger, one of these was very tight in the case............It's no good tapping on the 'castles' becase they just snap off, but there are some slots inside these near the oil seal which will stand up to tapping with a punch...............
Once these are out the diff and crownwheel can be slid over to one side and tilted out of the case, there is a knack to this, it looks like it won't come out, then just as you start swearing it will drop out LOL............
...............Undo the crownwheel bolts shown above, and tap the crownwheel off the diff assembly, and this is what I end up with.................
These are the bits that are needed, LSD Diff, Crownwheel Bolts, Bearing carriers and Flange Circlips.............
Next thrilling instalment building it all into a diff that has the correct ratio, and should be finishing the rollcage and fitting up the inside of the car.
Cheers Dave
It's nice to be important but it's more important to be nice !!
#596
- Group: Members
- Posts: 4142
- Joined: 22-January 04
- Location:Stoke on Trent
Posted 08 May 2011 - 04:23 PM
looking good there dave!! someone clearly knows what they are doing with diffs it seems!!
#597
- Group: Members
- Posts: 583
- Joined: 01-April 10
- Location:NW Scotland Highlands
Posted 08 May 2011 - 05:16 PM
warrenpenalver, on 08 May 2011 - 04:23 PM, said:
looking good there dave!! someone clearly knows what they are doing with diffs it seems!!
Cheers Warren,
Ex Transmission Specialist LOL.
Forgot to mention, inside of the car is now all painted Silver, only a rattle can job, but it looks neat and tidy....................I will be installing the rest of the cage in the next week or so, more pix soon.
Cheers Dave
This post has been edited by Dave2302: 08 May 2011 - 05:17 PM
It's nice to be important but it's more important to be nice !!
#598
- Group: Members
- Posts: 583
- Joined: 01-April 10
- Location:NW Scotland Highlands
Posted 18 May 2011 - 09:12 AM
2 X 3.9:1 Front diffs now overhauled and built, one to go on the car and one to go in the spares box !!
Rear diffs all stripped and ready to go together with LSD units.
Still waiting on a couple of joints to finish the roll cage, bloody cage is really holding me up
Huge sheet of 8mm Ally plate procured to chop up for sumpguard, it was abandoned in the woods by a rally team who rolled and destroyed a Scooby at the weekend
More pix soon,
Cheers Dave
It's nice to be important but it's more important to be nice !!
#599
Posted 19 May 2011 - 05:55 AM
To say I'm impressed wouldn't even be the starting point for any meaningful conversation . Just lovely work,
It will be one helluva car
. Just lovely work, It will be one helluva car
#600
- Group: Members
- Posts: 583
- Joined: 01-April 10
- Location:NW Scotland Highlands
Posted 19 May 2011 - 09:48 AM
Cheers Buddy,
It's at that stage now where 3 - 4 weeks solid and about 3 grand (gravel spec coil overs are £2100), will see it fnished.............
Trouble is with other commitments I don't have 3 - 4 weeks straigh off LOL, but I'm getting itchy fingers to get it finished................It's just important at this stage not to rush it and make a pigs ear of it
Regards Dave
It's nice to be important but it's more important to be nice !!


